Tag Archives: ESP8266 project


DIY baby monitor that streams audio over wifi using ESP8266

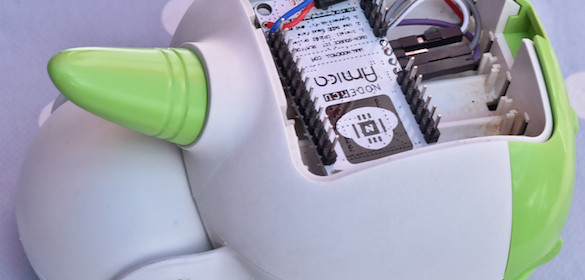
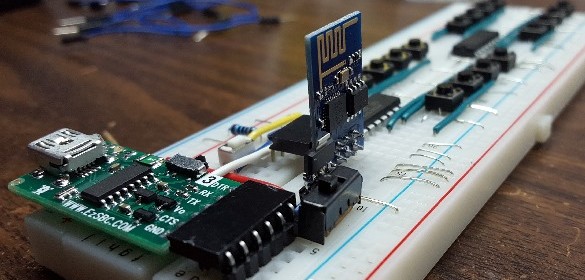
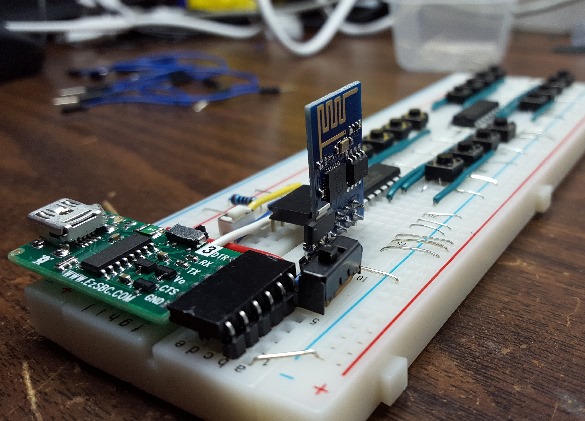
This DIY baby monitor built by Sven337 uses two ESP8266 NodeMCU modules to send audio over wifi. The transmitter part consists of an inexpensive electret microphone to capture the audio in the room. The audio signal is amplified and converted to 12-bit digital samples using Microchip’s MCP3201 SPI ADC chip. The ESP8266 then reads the ADC samples through an SPI interface. The digital sound data is then sent over wifi using UDP packets to the receiving side ESP8266, where the analog audio is reconstructed using an MCP4725 12-bit I2C DAC device followed by an amplifier.

ESP8266 DIY baby monitor

ESP8266 DIY baby monitor

The ADC needs to be audio capable (able to sample at 20kHz or more), cheap, and preferably using SPI (because the ESP8266 has a hardware SPI interface, but no hardware I2C interface). I picked the 12-bit MCP3201, and I am very happy with it. I went for the DIP package, if I had to do it again I would probably buy it in a surface mount package. It’s not usuallymuch harder to solder and occupies less physical space – which in many projects, including this one, can be a real advantage. The MCP3201 is single channel. More channels didn’t cost all that much more, but required more pins, and I couldn’t afford that on the 5×5 cm board the project had to fit on.

[via Hackaday]

16-channel wifi remote using ESP8266

Hari Wiguna has shared on Hackaday.io this interesting scheme of making a 16-channel Wifi remote using ESP8266 and PCF8574 I/O expander chips. PCF8574 device provides an 8-bit I/O expansion for any microcontroller through an I2C interface. This Wifi remote consists of a transmitting remote unit and a receiving control unit, both of which use one ESP-01 module and two PCF8574 devices. The remote unit has 16 push switches connected to the PCF8574 I/O pins, whereas the receiving unit has 16 LEDs connected in a similar fashion to the two PCF8574 chips. The remote ESP-01 module operates as a web client that reads the states of the push switches and send that info to the control ESP-01 module, which operates as a web server, as part of the web request. When a button is pressed on the client side, the web server responds to this request by changing the logic state of the corresponding LED on its end.

16-channel Wifi remote

16-channel Wifi remote

ESP8266 based Weather Station with a beautiful look

Dennisv15‘s Weather Station is WiFi enabled using ESP8266 and uses a 2.4″ OLED to display the weather data. It has got one of the most beautiful enclosure made of Acryllic sheet laser-cut in the shape of the Sun and cloud. The shapes are illuminated with different colors based on the weather forecast using RGB LEDs. The firmware is based on Daniel Eichhorn’s popular design of an ESP8266 based weather station that includes measurement of the indoor temperature and humidity using DHT22 and retrieving local forecast data from Wunderground.

ESP8266 weather station

ESP8266 weather station

Wifi controlled thermostat

This Instructable describes how to build a wifi controlled thermostat that can be programmed over the internet as well as locally through a touchscreen TFT LCD display.

Wifi controlled thermostat

Wifi controlled thermostat

The system uses a Raspberry Pi as a central hub that serves web pages so I can control the thermostats from anywhere. The hub also handles all of the wireless communication over nRF24L01+ radio modules (I know I said “WiFi,” and the nRF24L01+ radio module isn’t technically WiFi, but more on that later), and maintains a MySQL database with the thermostat programming as well as any data logging I do. And finally, the hub runs two servers written in Python – one controls the thermostat (as an intermediary between the web-page and the thermostat) and the other handles data logging. I believe this could probably be done with the thermostats each serving its own simple web-page and sending data directly to the MySQL database. This would eliminate the need for the lighttpd web-server and the two python servers. But, I feel like doing this on the hub does provide the simplicity of a single web-site, and the python servers provide a lot of flexibility. Plus I don’t have to update the code on the thermostats whenever I want to make changes to these aspects.

ESP8266 energy monitor

Brian Dorey designed a standalone home energy monitor using the ESP8266 and a bunch of sensors that to monitor the mains current, the consumption of electric energy, as well as the gas usage. His ESP8266 energy monitor measures the mains current using the iSnail current sensor, which is a self powered AC current transducer that provides a 0-5V dc analog signal proportional to the AC current flowing through it. The output from the current sensor is digitized using the ADS1115 16-bit ADC from Texas Instruments and is fed to the ESP8266 through I2C bus. His electric meter has a blinking LED on the front panel that blinks once for every Wh of energy used. So he monitored the blinking LED to track the energy usage using a phototransistor placed in front of the electric meter.

ESP8266 energy monitor

ESP8266 energy monitor

The software was designed in Visual Studio 2015 using the Visual Micro plugin which allowed us to write the Arduino based code in an IDE that is far more user friendly than the normal Arduino editor.  The code is basically a web server that allows you to view the various data on a web page or return an xml feed with the same data values. The ADC is sampled once a second and stored in an array of 60 samples allowing us to average the current usage over a minute.  Interrupts were used for the gas and electric meter inputs which increment the variables for each meter and then set a flag to tell the main program loop to save the values to FRAM on its next loop.

The values returned on the xml feed are the meter readings for the gas and electric meter, the mains current usage at the time of the reading, the average current value over the last minute and the maximum current value for the last minute.  A web page was also added for updating the gas and electric values for when the data logger is originally set up, and if it goes out of sync with the gas meter due to a power cut.

« Older Entries Recent Entries »