Author Archives: R-B

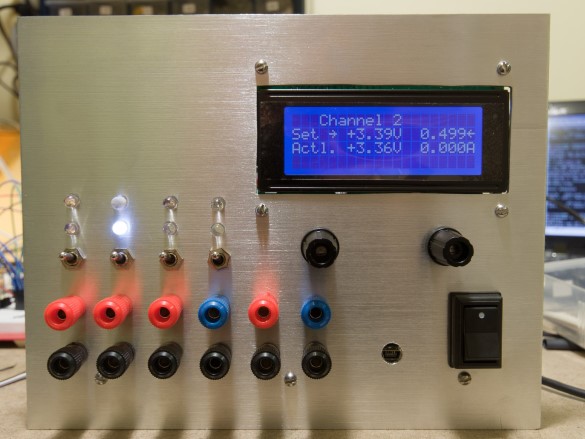
Open source, modular bench power supply

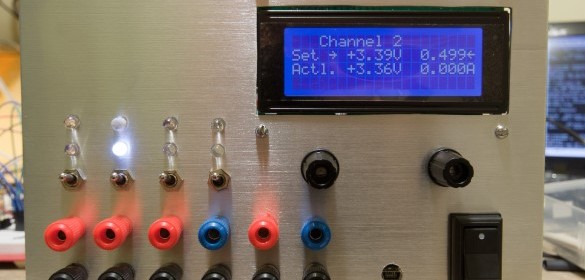
Here’s a neat bench power supply design from a Hackaday user which offers very interesting features such as software calibration, programmatic control via USB Raw HID, etc at an affordable price. While this is still an ongoing project, the author defines his final goals of this project as:

  • Modular power supply from 1 to 6 channels (I am planning on having 4: 3x positive, 1x negative)
  • Each channel can independently be set from 0-12V (for positive channels) or -12-0V (for negative channels), and the output can go all the way to 0.
  • Configurable set points for voltage and max current for each channel
  • Actual readings for voltage and current for each channel
  • Low cost – it’s not as cheap as scrapping an ATX power supply (which is what I am using today), but the extra features such as current limiting should more than make up the extra cost.
  • Active (fan) cooling combined with heat sinks to support sustained high current loads
  • USB control (voltage and current set points), logging of actual voltage / current readings, and computer-based calibration.
  • The ability to use potentiometers for voltage / current set points instead of a microcontroller, if desired (each channel has four analog I/Os: Voltage and Current setpoints, and Voltage and Current sense outputs. All of these are in the range of 0-5V, allowing easy control from either a potentiometer or a DAC.
Bench power supply

Bench power supply

Automation of an old-school knob-turny style AC unit

If you have an old-school knob-turny style window AC unit that is still in working condition, you might want to read this article from Phil Rowe who talks about how he reinvigorated his old AC unit to a fully automated AC system using Arduino. He writes,

This article covers the development of an Arduino controlled air conditioning system. It converts an old school, in-window, air conditioner (AC) which was in a very hard to reach spot to an automatic system which can be activated and monitored from MegunoLink Pro at your desk. The system consists of an Arduino Uno, a servo driven mechanism to active the AC, a DS18B20 temperature sensor, and MegunoLink Pro to plot the temperature and control the set points.


Automation of an old-school AC unit

Automation of an old-school AC unit

How to use HC-SR04 ultrasonic ranging module

Samuel Alexander, a 10th grader from Surabaya, Indonesia, has posted an Instructable on how to use the HC-SR04 ultrasonic module with Arduino for simple distance ranging applications. HC-SR04 is a common choice among hobbyists for obstacle detecting in robotic applications, and his Instructable would be helpful for beginners to learn how to hook this ultrasonic ranging module in your Arduino project.

Ultrasonic ranging

Ultrasonic ranging

USB temperature logger using minimal components

This PIC16F1455-based USB temperature logger is one of the simplest designs I have ever seen and uses only 2-components, the PIC microcontroller itself and an USB connector. It uses PIC’s internal temperature indicator module for sensing the ambient temperature.

Simplest USB temperature logger

Simplest USB temperature logger

The PIC16F1455 is a relatively new microcontroller that can do USB without an external crystal. It also has internal pull-up resistors for the USB data lines. These things mean no extra hardware is necessary for USB communication.

I needed something useful to send over USB and I noticed that the PIC16F1455 has a Temperature Indicator Module. This peripheral will let you read the operating temperature of the silicon die over the ADC. It’s not terribly accurate, but the silicon die temperature will be about equal to the outside temperature.

I carefully soldered a male USB Type A connector to the PIC16F1455’s Vdd, Vss, D+, and D- pins. Then, using the M-Stack USB Stack from Signal 11, I wrote a program to enumerate the PIC16F1455 as a USB CDC serial device and send the temperature in ADC counts as an ASCII string at 1 Hz.

From the computer side, it’s easy to connect to the USB temperature data logger like any other serial device, parse the incoming strings, and save the data to a file with a timestamp.

The last step is to map the ADC counts to a temperature scale. Microchip has an application note AN1333 with some equations. However, for a constant Vdd, the scale is pretty linear so it’s easiest to record the ADC count at two known temperatures and interpolate between them.

IoT enabled lawn mower

Michel from Quebec, Canada recently bought a EGO brand battery powered lawn mower to which he added an ESP8266 module along with a PIC MCU and a couple of hall sensors to make it an IoT-enabled mowing device that is now capable of sending tweets during its mowing session.

Tweeting lawn mower

IoT enabled lawn mower

To make sure I would not void my mower’s warranty I’ve used 2 Hall Effect sensors and a few magnets: one on the bail switch, five on a wheel. Three revolution of a rear wheel represent a distance of 245cm (~96½”). There are 10 spokes on the back of the wheel. With five magnets this gives me a resolution of 16.33cm (6.43″). The display I’m using is a Digole 160×128 True Color TFT LCD. I like Digole’s displays because they have a backpack with a complete graphic engine and 7 preloaded fonts. The kit run on 2 AAA batteries. The ESP8266 is initialized on power-up to get the actual time on my Windows Home Server and placed to sleep to minimize the power consumption. When it’s time to publish a hard reset is done. At the end of transmission the ESP8266 is put to sleep again.


« Older Entries Recent Entries »