Lab 10: DC motor interfacing to PICMicro
|
|
Description
Perhaps one of the most entertaining things to do with an embedded microcontroller is to get it to actually move something. Three very popular devices used to “make things move” include dc motors, RC servos, and stepper motors. This lab session will look at how you can interface a dc motor to a PIC microcontroller.
Required Theory
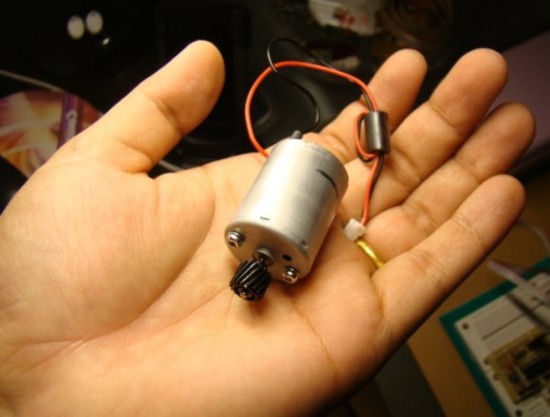
DC motors are simple two-lead, electrically controlled devices that convert electrical power into mechanical power through the interaction of two magnetic fields. One field is usually produced by a stationary permanent magnet (on the stator), and the other field is produced by an electric current flowing in the motor coil (on the rotor). The interaction of the two fields results in a torque that tends to rotate the rotor. For this experiment, a reversible, permanent magnet, brushed DC motor is selected. The term ‘reversible’ means the rotation of the motor can be reversed by simply flipping the terminals of the DC power supply. One such motor is shown below. I got it from my old broken printer. The dc motors are found in CD players, toy cars, cassette player, printers, etc.
Modes of a brushed dc motor
A brushed dc motor has four fundamental modes: clockwise mode, counter-clockwise mode, coast mode, and brake mode. In clockwise mode, the motor rotates in the direction of the clock, and the counter-clockwise mode is just the reverse of the clockwise mode. Switching between clockwise and counter-clockwise rotation is very simple. It can be done by simply flipping the terminals of either the power source or the motor itself.
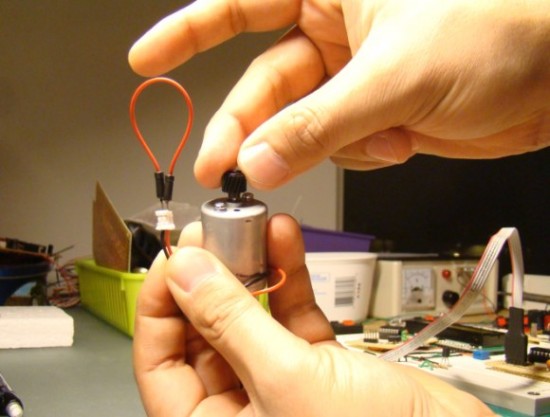
The coast mode refers to the free spinning mode of the motor. If you twist the motor shaft with your fingers, leaving both the terminals of the motor open, you will see the shaft continues to rotate for a short time, until the kinetic energy of the shaft is totally consumed through friction. Therefore, in coast mode, the terminals of a motor are left floating and the motor comes to stop slowly.
The brake mode is used to rapidly stop the motor, and is done by shorting both the terminals of the motor. The motor behaves as a generator when it is rotating, and if the terminals of the motor are shorted, it acts as an infinite load bringing the motor to a rapid stop. Now the energy in the motor is decayed much faster as it is consumed not only through friction but also in the motor’s coil.
You can do a simple experiment to distinguish between the coast and brake mode. Take a brushed dc motor and try to spin the shaft with your fingers, leaving the leads floating. You will observe the shaft rotates freely (coast mode). Now try again with the leads shorted. You will find the motor has become more sluggish than in the coast mode.
Coast mode: Motor spins freely
Brake mode: Motor becomes more sluggish
Motor Driver
Microcontrollers are designed for data processing, which requires millions of skinny pathways and microscopic switches. On the other hand, motors are straight forward and power hungry. Because of the internal structure of microcontrollers, they cannot supply enough current needed to run a motor directly. Therefore, an external driver circuit is required to deliver the electrical power to a motor under the control of the microcontroller. Such a driver circuit can be as simple as a single transistor or as complicated as an integrated chip with some additional components attached.
Single transistor motor driver
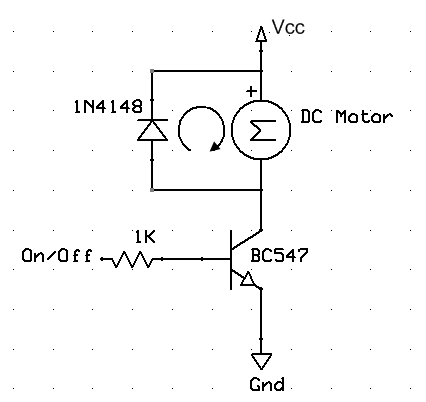
The most basic motor driver circuit is a single transistor switch that can only turn a motor on or off. The single transistor can turn the motor on in one direction only, either clockwise or counterclockwise, depending upon how the motor is connected in the circuit. It also doesn’t permit the motor to be electronically braked. The circuit diagram of a single transistor motor driver is shown below.
In this example, I have used an ordinary BC547, which is a general purpose NPN transistor. I picked this because it is inexpensive and commonly available. However, this transistor isn’t very powerful, and can provide maximum driving current up to 100 mA. The objective of this tutorial is to explain the principles of motor drivers, and readers are suggested to select transistors with proper current ratings to fulfill their requirements. But this particular driver circuit is still good for driving small dc motors that require less than 100 mA current.
The working principle of this circuit is very simple. The transistor acts as a power switch for the motor. The switch can be controlled through the logic voltage applied at the On/Off terminal (see figure above). When the On/Off pin is at logic 1 (+5 V), the transistor is turned on and the motor is connected across Vcc and ground. The Vcc voltage could be greater than 5 V. Therefore, one benefit of this single transistor motor driver is that you can control a higher voltage motor (> 5 V) with a 5 V logic output from a microcontroller. The logic 0 at the On/Off terminal turns the transistor off and the motor is stopped. The 1K resistor connected in series with the base of the transistor limits the base current to a safe level.
The diode connected across the motor terminals is for the protection of the transistor. When the switch is turned off, the collapsing electromagnetic field inside the motor generates a high voltage across the motor terminals with reverse polarity. This voltage could be high enough to damage the transistor permanently. The diode provides a current path back through the motor coil, and hence prevents any high voltage formation. During normal condition the diode is reverse biased and doesn’t affect the switching operation of the transistor.
In order to test this circuit, we will replace the LED in Lab 2 (Basic digital input and output) arrangement and connect the RC0 pin of PIC16F688 to the On/Off terminal of the above transistor driver circuit. Load the PIC16F688 with the same HEX code from Lab 2, and you will see the motor can be turned on and off by simply pressing the input switch. The direction of rotation could be clockwise or counterclockwise based on how the terminals of the motor are connected.
Controlling the on/off operation of a dc motor using a single transistor
H-Bridge Motor Driver
The single transistor motor driver has limitations. It can control a motor in only one direction and does not allow electronic braking too. A classic H-bridge motor driver provides all 4 operating modes of a dc motor. It is called H-bridge because its circuit looks like a capital letter H.
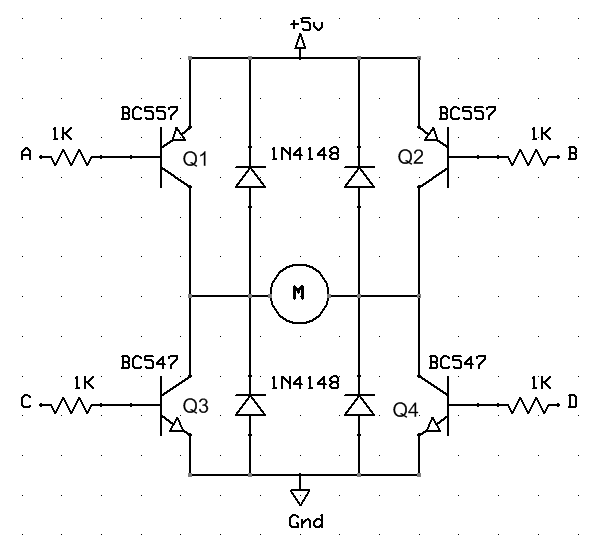
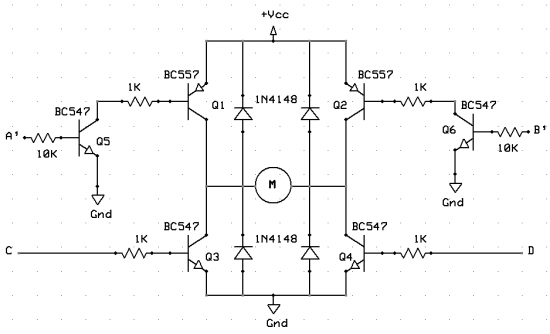
A standard H-bridge circuit consists of four transistors (two PNPs on top and two NPNs on the bottom as shown below). The left half of the circuit is mirrored form of the right half. The four inputs of the driver circuit are named as A, B, C, and D. When the terminal B is grounded and the terminal C is pulled high (+5 V), the transistors Q2 and Q3 conduct. This provides a path for current to flow from Vcc (+5 V), through Q2, through the motor, through Q3 to the ground. This turns the motor on in one direction. Next, if the terminals A and D are connected to ground and +5 V, respectively, Q1 and Q4 are switched on, providing a current path from Vcc (+5 V), through Q1, through the motor, through Q4, and to ground. This time the current through the motor is flowing in other direction and so the motor spins in the opposite direction.
Braking mode can be achieved either by applying logic 1 (+5 V) to pins C and D or by grounding A and B. In both the cases, the motor terminals are effectively connected.
The cost mode corresponds to when all the four transistors are turned off. This happens when A and B are at logic 1 (+5 V) while C and D are grounded. Then the motor can spin freely as the motor leads are connected to nothing.

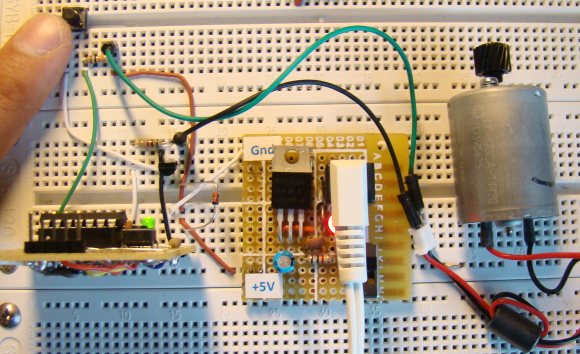
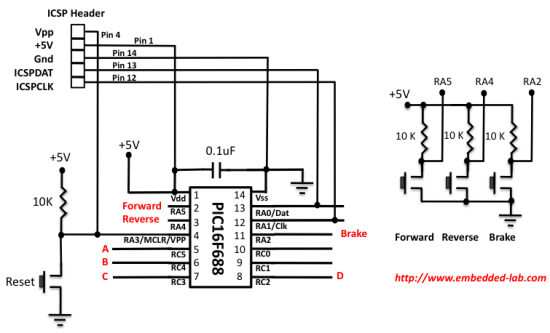
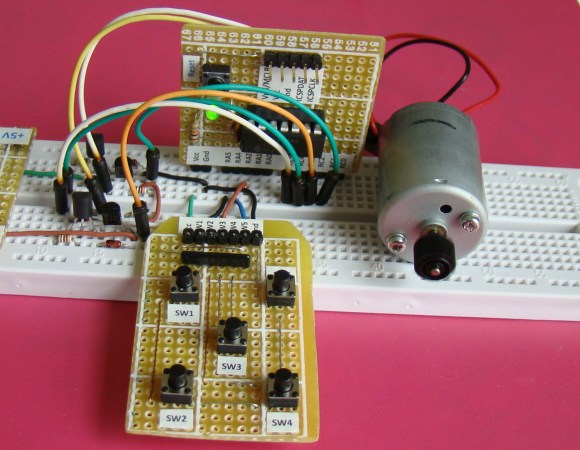
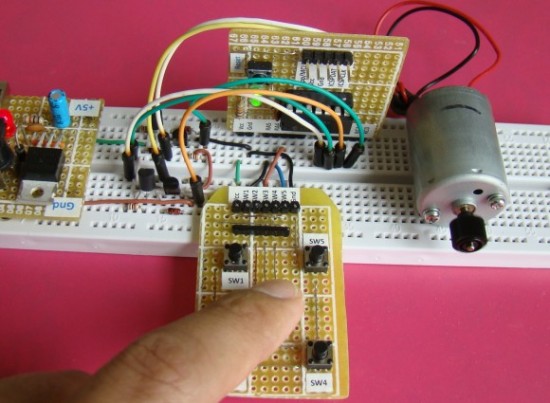
This H-bridge will be tested with a dc motor and the PIC16F688 module. Four I/O pins of PIC16F688 are required to control the clockwise, counterclockwise, and braking modes of the dc motor. These four pins will output the appropriate logic levels at pins A, B, C, and D corresponding to the desired mode. Our test arrangement also includes 3 push buttons to provide selection inputs for clockwise rotation, counterclockwise rotation, and brake mode. The circuit diagram of the arrangement is shown below.
H-bridge setup on the breadboard
Important note
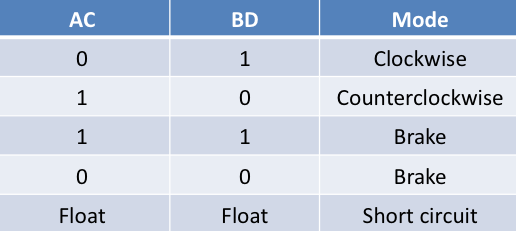
While implementing the H-bridge circuit, you must be careful about switching on the right transistors at right time. If you are not careful and switch on both Q1 and Q3 (or Q2 and Q4) simultaneously, that will result in a short circuit and the transistors may burn out. Out of 16 possible combinations for A, B, C, and D inputs, 7 results in short circuits, which must be avoided. You can also tie A with C (say, AC terminal), and B with D (BD terminal) so that now you will have only two terminals to control the motor. If you apply 1 at AC and 0 at BD, the motor runs in one direction, and switching the logic levels at AC and BD will turn the motor on in reverse direction. Applying 0 or 1 to both AC and BD will brake the motor. The important thing is you cannot leave any of the terminals AC and BD float. Let’s look at the AC terminal in more detail. Since A and C are tied together, and if it is left float then there will be a path for current through the collector of Q1, through its base, through the base of Q3, through its emitter to the ground. So, Q1 and Q3 are on resulting a short circuit. So, you must be careful if you are thinking about reducing the control pins by tying A with C and B with D. You just can’t leave the tied terminals open or float. They should be either grounded or pulled high.
Once again, this circuit is just for testing a small motor under no load. If you need a more practical circuit for driving a motor with load then you should consider using transistors with higher current rating. Replacing BC557 with 2907A and BC547 with 2222A transistors can increase the driving capacity of the circuit up to 600 mA. If your requirement is still higher than that, it is suggested to use the MOSFET instead of BJTs.
Software for testing H-Bridge
/*
 Lab 10: DC Motor control (H-Bridge)
 Copyright @ Rajendra Bhatt, 2010.
 Description: Forward and reverse motor control
 MCU: PIC16F688
 Oscillator: Internal clock at 4.0 MHz, MCLR Enabled
*/
sbit Forward at RA5_bit;
sbit Reverse at RA4_bit;
sbit Brake at RA2_bit;
sbit PinA at RC5_bit;
sbit PinB at RC4_bit;
sbit PinC at RC3_bit;
sbit PinD at RC2_bit;
void GetDelay(){
 Delay_ms(300);
}
void main() {
 CMCON0 = 0x07; // Disable comparators
 ANSEL = 0b00000000;
 PORTC = 0x00;
 TRISC = 0b00000000; // PORTB all output
 TRISA = 0b00111100; // RA5, RA4, RA2 inputs
 do {
  if (!Forward){
  GetDelay();
  PORTC = 0;
  GetDelay();
  PinA = 0;
  PinB = 1;
  PinD = 1;
 }
 if (!Reverse) {
  GetDelay();
  PORTC = 0;
  GetDelay();
  PinA = 1;
  PinB = 0;
  PinC = 1;
 }
 if (!Brake) {
  GetDelay();
  PORTC = 0;
 }
 } while(1);
}  // END main()
The above H-bridge circuit has a major disadvantage that it cannot be used to drive a motor with voltage greater than 5 V (voltage for logic 1). This H-bridge circuit works because it is powered with the same voltage as that of a logic 1 voltage from the microcontroller. If you want to drive a 9 V motor and change Vcc to 9 V, then transistors Q1 and Q2 will still be on when the logic levels at terminals A and B are high (+5 V). In such a case you need an additional voltage translation circuit between the microcontroller and the H-bridge circuit that converts the logic 1 voltage (which is +5V) to 9 V. Or you can also use two additional NPN transistors to the H-bridge circuit to resolve this problem (shown below). Now the control pins are A’, B’, C and D. It is left for readers to figure out the appropriate logic levels at these pins for controlling the operation of the motor.
Reference:
Intermediate Robot Building by David Cook
|
|

Hi, I try to drive 3V dc motor with MSP430. I try to connect it using the picture u showed using NPN transistor. But I used NPN BC549. but the DC motor is not moving. please help me
Hi,
Hi, My name is Sri and I am R&D Lead, developing new products.
For my upcoming project, which has DC motors, I am looking for a microchip controller per the following requirements,
To control DC motor whose specs are,
6V/12V supply voltage,
15 to 30A power
Need a micro chip controller that can,
1, Reduce the speed of the motor from 60RPM to 2rpm,
2, Handling functions like CW AND CCW (clockwise and counter cwise)
3, time based forward and revers motion: Soft start – CW for 2seconds – soft stop- pause1sec – soft start CCW for 2seconds – soft stop – number of cycles
4, Alternatively proximity/touch sensor based CW and CCW (the board should be capable of giving the choice to select either sensor driven or time driven
5, ON/OFF using remote.
6, Number of cycles be relayed to any mobile phone.
Can you please suggest if there are any such micro controllers that I can use for the purpose.
this motors, I obtained from a new Toy car, from toysrus that is capable of driving upto 165lb total kids weight. having said that, I dont have an idea whether these are brushless motors or the other way round.
Look forward to here from you.
Best regards,
Hey,
Thanks for making me understand H bridge, I always used double pole relays to change the directions. Are there any disadvantages of using a relay for driving the motor??
H R-B,
I’m so happy to find this webpage, because I found this very useful with hands-on important information for all how like to learn micro-controller & especially for me.
I made this project & i practice some ideas, I would like to share you that.
I found that i can press forward once & twice without hang the motor & restart again, & so on for Button reverse.
Please take a look for my modified code & let me know your idea about it.
thanks for advanced
Your’s
Sallam
“”
sbit Brake at RA2_bit;
sbit Forward at RA5_bit;
sbit Reverse at RA4_bit;
sbit pinA at RC2_bit;
sbit pinB at RC3_bit;
sbit pinC at RC4_bit;
sbit pinD at RC5_bit;
void Brake_DC()
{
portc=0;
}
void main()
{
CMCON0=0x07;
ANSEL=0x00;
trisa=0xff;
trisc=0x00;
while(1)
{
if(!Forward){delay_ms(300);
Brake_DC();
delay_ms(300);
//portc=0b00101000;
while(Reverse && Brake){
pinA=0;pinB=1;pinC=0;pinD=1; // B & D
}
}
if(!Reverse){delay_ms(300);
Brake_DC();
delay_ms(300);
while(Forward && Brake){
pinA=1;pinB=0;pinC=1;pinD=0; //A & C
//portc=0b00010100; //A & C
}
}
if(!Brake){
delay_ms(300);
portc=0;
}
}
}
Hi Raj,
I’m happy to discovered your webpage. Definitely useful with hands-on informations for beginners (like me) who would like to turn this knowledge into job-projects. I mean, I’d like to embed PIC-s for my job’s test jigs, carry out complex task (semi automated measure, data acquisition, programmable device tester).
I’d like to see among other things a project about stepper motor control. I’m also interested in theory of interfacing power devices, for example driving with precisely generated and controlled impulse in area of 100usec or less.
Best regards
Bela
Pingback: Can i run a 12vdc motor through microcontroller
hai………………..
Howdy-do, The Lab 10: DC motor interfacing to PICMicro :Embedded Lab info above is great have you got a RSS Feed
can u control the no of revolutions you want the motor to make and then stop when the entered no of revs are made.say u put 200 revs usings tap buttons.then the lcd should show the no of revs made..and stop the motor when this revs are made?
joseph,
It may not be possible with a normal DC motor, but stepper motor do have that capability.
Pingback: DC motor interfacing to ARM LPC2148 for speed control
Pingback: pic controlled power supply « Bioelectronics
looking forward to servo control using micro c..
your site is amazing and very useful
hi, R-B
Your Tutorials and Projects are very useful.
by it i made a wide steps in Micro-controller.
so thank you very much.
======================================================
Could you please write an article or do an experiment to show how to control Servo-motor(hobby servo)using micro-controller.
Pingback: Embedded Lab: DC Motors | PyroElectro - News, Projects & Tutorials
Pingback: Electronics-Lab.com Blog » Blog Archive » DC motor interfacing to PICMicro
Cool article! To avoid H bridge and the “smokeable” feature, you can use an hybrid approach (uses both relays and transistors), which is way better:
http://gzaloprgm.com.ar/images/ph3.png
Basically the idea is to use the transistor to turn the motor on/off (while allows PWM) and use a double inverter relay to invert the polarity of the motor. It might be cheaper in some cases.
And more info in my web http://gzaloprgm.com.ar/puenteh (its in spanish)
Cheers,
Gzaloprgm
Gzaloprgm,
Liked your hybrid approach.
please elaborate in English how to drive dc gear motor using relay and transistor?
Pingback: Electronics-Lab.com Blog » Blog Archive » Tutorial: DC motor interfacing to Microcontrollers