Netduino Day 7 – RGB LED color formation using Pulse Width Modulation
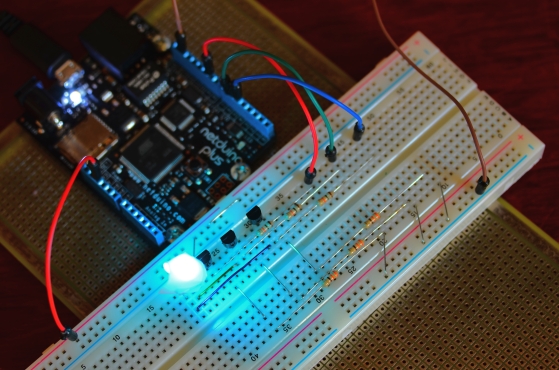
|
|
Pulse Width Modulation (PWM) is a digital method of delivering a varying amount of power to a load, and hence can be used to control the brightness of an LED or speed of a DC motor. Controlling the power, we will make this tutorial colorful using a Red Green Blue (RGB) LED. Each segment (lead) of an RGB-LED will get a PWM signal via RgbLed class allowing us to illuminate the RGB-LED with any color defined by RGB. This class can also generate random colors. Using the RgbLed class, some standard colors can also be sent to a RGB-LED.
Circuit Setup and Theory
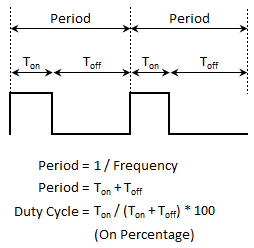
To understand PWM, let’s understand the terms that make a modulated pulse width signals. The very important one is Duty Cycle. In lay man terms this duty cycle is a value in percent of ON status compared to OFF status. From the figure below we can see the formula to calculate the duty cycle.
Now, let’s co-relate the above to our project. Let’s say we like to produce a “grey” color. We know the RGB value for grey is 128, 128, and 128. This means, if we mix 50% of red (50% of 256 is 128), 50% of green and 50% of blue, we will get a grey color. The value of 50% came from 128/256*100 %. With respect to above figure, if Ton = 50% for Red leg, Ton = 50% of Green leg and Ton = 50% of Blue leg of a RGB LED then we will have a gray color out from a RGB-LED. The calculated value is nothing but the duty cycle of a PWM. In the RgbLed class, we basically adjust the duty cycle to illuminate the RGB-LED with a desired color.
Here is a DutyCycle Excel spreadsheet to understand it little further and it also somewhat followed in the RgbLed class.
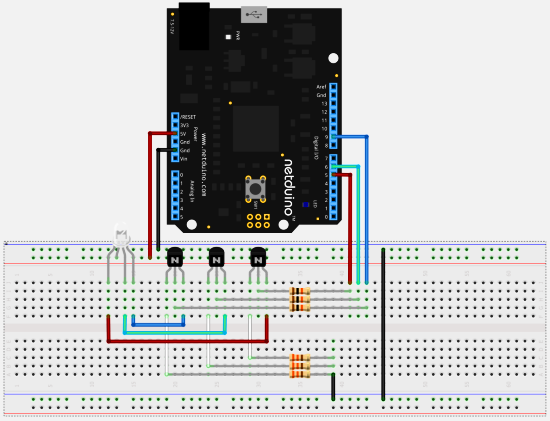
The connections are not that difficult. Netduino digital pins, 5, 6, 9 and 10 can be configured as PWM pins, out of which we will configure 5, 6 and 9. The outputs of these pins are fed to the base of a NPN transistor. When the pulse is high, the transistor goes into saturation mode and allows the flow from collector to the emitter where our RGB LED is connected. Since the RGB-LED used in this tutorial is common anode, the anode lead is connected to +5v. The circuit diagram below illustrates the connection.
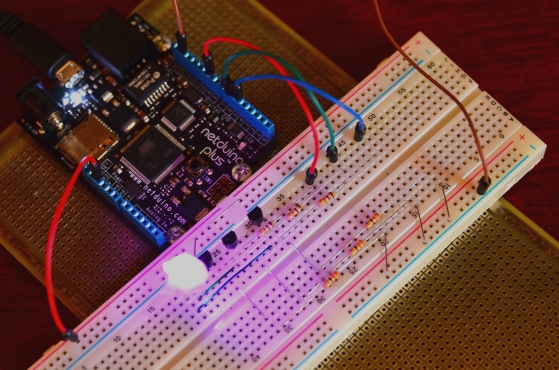
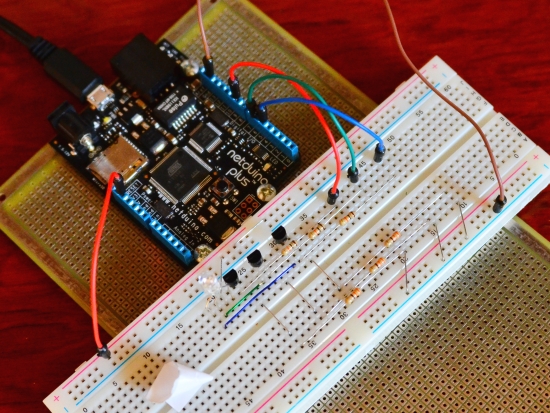
Picture below shows the circuit setup on a breadboard and its connections to the Netduino.
…and here is actual connection. For the aesthetics of the circuit connection, wires are rearranged.
C# .NET Program
Using the RgbLed class is really simple so let’s skip it for now and focus into the class itself. The constructor of the class takes four arguments, pin number for red, green and blue, the last argument is optional for commonAnode which is true by default. Based on the circuit diagram it’s not too important whether we set this value to true or false. In this constructor method new instances of PWM class are crated then a ColorTable Hashtable is populated with standard color.
public RgbLed(Cpu.Pin redPwmPin, Cpu.Pin greenPwmPin, Cpu.Pin bluePwmPin, bool commonAnode = true) { RedLED = new PWM(redPwmPin); GreenLED = new PWM(greenPwmPin); BlueLED = new PWM(bluePwmPin); LEDs = new PWM[] { RedLED, GreenLED, BlueLED }; CommonAnode = commonAnode; ColorTable = new Hashtable(); ColorTable.Add(0, new byte[] { 0, 0, 0 }); // Off (~~ Black color) ColorTable.Add(1, new byte[] { 0, 100, 100 }); // Aqua ColorTable.Add(2, new byte[] { 0, 0, 100 }); // Blue ColorTable.Add(3, new byte[] { 100, 0, 100 }); // Fuchsia ColorTable.Add(4, new byte[] { 50, 50, 50 }); // Gray ColorTable.Add(5, new byte[] { 0, 50, 0 }); // Green ColorTable.Add(6, new byte[] { 0, 100, 0 }); // Lime ColorTable.Add(7, new byte[] { 50, 0, 0 }); // Maroon ColorTable.Add(8, new byte[] { 0, 0, 50 }); // Navy ColorTable.Add(9, new byte[] { 50, 50, 0 }); // Olive ColorTable.Add(10, new byte[] { 50, 0, 50 }); // Purple ColorTable.Add(11, new byte[] { 100, 0, 0 }); // Red ColorTable.Add(12, new byte[] { 75, 75, 75 }); // Silver ColorTable.Add(13, new byte[] { 0, 50, 50 }); // Teal ColorTable.Add(14, new byte[] { 100, 100, 100 });// Whilte ColorTable.Add(15, new byte[] { 100, 100, 0 }); // Yellow } |
There are three public methods available for setting a color, the TurnIT, Write and RandomColor methods. To have standard color, call TurnIt method and pass the standard color from Color Enum. The Write method takes three byte arguments for red, green and blue color. Finally, RandomColor will calculate random number for the red, green and blue color value.
public void TurnIt(Color color) { if (ColorTable.Contains((int)color)) { colorArray = (byte[])ColorTable[(int)color]; SetColor(); } else throw new Exception("Color not found"); } public void Write(byte red, byte green, byte blue) { colorArray = new byte[] { (byte)(red * 100 / 255), (byte)(green * 100 / 255), (byte)(blue * 100 / 255) }; SetColor(); } public void RandomColor() { Random random = new Random(); colorArray = new byte[] { (byte)random.Next(100), (byte)random.Next(100), (byte)random.Next(100) }; SetColor(); } public override string ToString() { colorString = string.Concat("RGB(", colorArray[0], ", ", colorArray[1], ", ", colorArray[2], ")"); return colorString; } |
All the public methods internally call the SetColor private method which basically changes the duty cycle of the PWM instances for each read, green and blue pins.
private void SetColor() { if (CommonAnode) colorArray = AdjustPolarityValue(colorArray); LEDs[0].SetDutyCycle((uint)colorArray[0]); // Red LEDs[1].SetDutyCycle((uint)colorArray[1]); // Green LEDs[2].SetDutyCycle((uint)colorArray[2]); // Blue } private byte[] AdjustPolarityValue(byte[] colorArray) { return new byte[] { (byte)(100 - colorArray[0]), (byte)(100 - colorArray[1]), (byte)(100 - colorArray[2]) }; } |
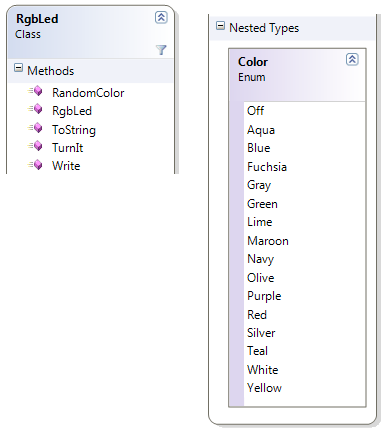
Here’s the RgbLed Class diagram:
Output
To demonstrate the usage of each three public methods, there are three parts in the video. First it shows the standard color then it shows spectrum of colors by looping through different color loops and finally some random color.
… to show some standard colors
RgbLed led = new RgbLed(Pins.GPIO_PIN_D9, Pins.GPIO_PIN_D6, Pins.GPIO_PIN_D5, false ); // Display standard colors led.TurnIt(RgbLed.Color.Red); WaitAndTurnOff(500, led); led.TurnIt(RgbLed.Color.Navy); WaitAndTurnOff(500, led); led.TurnIt(RgbLed.Color.Purple); WaitAndTurnOff(500, led); led.TurnIt(RgbLed.Color.Green); WaitAndTurnOff(500, led); led.TurnIt(RgbLed.Color.Maroon); WaitAndTurnOff(500, led); led.TurnIt(RgbLed.Color.Blue); WaitAndTurnOff(500, led); led.TurnIt(RgbLed.Color.Fuchsia); WaitAndTurnOff(500, led); led.TurnIt(RgbLed.Color.Teal); WaitAndTurnOff(500, led); led.TurnIt(RgbLed.Color.Yellow); WaitAndTurnOff(500, led); |
… to show different colors
for (int red = 0; red < 255; red += 50) { for (int green = 0; green < 255; green += 50) { for (int blue = 0; blue < 255; blue += 50) { led.Write((byte)red, (byte)green, (byte)blue); Debug.Print(led.ToString()); WaitAndTurnOff(100, led); } } } |
… and for generating random colors (looping 20 times),
for (int i = 0; i < 20; i++) { led.RandomColor(); WaitAndTurnOff(500, led); } private static void WaitAndTurnOff(int time, RgbLed led, byte longerOn = 2) { Thread.Sleep(time * longerOn); led.TurnIt(RgbLed.Color.Off); Thread.Sleep(time); } |
Here’s a quick output video of the above code.
|
|

can i get a program in assembly language for hcs dragon12 plus board
Pingback: Tutorial Netduino Parte 7 « Soloelectronicos
nice PWM,,,,,,,,,,,is it one led or 3 led.
It is one RGB LED.
Pingback: » Good PWM tutorial for Arduino Fuzzy Hypothesis Online