Monochrome Composite Video using Atmega8

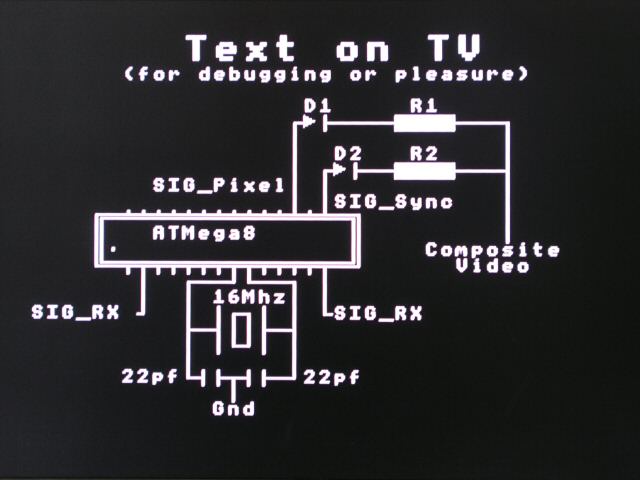
This article describes the design of a Text on TV project. It takes serial data and displays text on a TV screen. The hardware part of this project is pretty simple. It uses an Atmega8 microcontroller that runs with a 16 MHz crystal. The article provides the details on PAL and NTSC timing signals, as well as how to implement the signals in software.

Read more

Breadboard module for PIC16F628A

Here’s another breadboard module that carries a PIC16F628A microcontroller. The power supply pins and the I/O ports of the PIC16F628A microcontroller are accessed through male headers. It can be easily plugged into a breadboard and is very useful for quick prototyping. It frees up a lot of space on the breadboard since the oscillator, reset, and ICSP circuits are already built on the module. It is different from the previous PIC16F688 breadboard module in the way that the microcontroller now runs with an external 4.0 MHz crystal. So, this module will be more appropriate for experiments that require accurate timing

Read more

Cellphone controlled robot vehicle

When we talk about wireless robot vehicles, we usually think about the RF circuits. But this project is different. It uses a mobile phone to control the motion of a robotic vehicle, and therefore, the range of operation is as large as the coverage area of the service provider.

Read more

Wifi robot vehicle controlled by PIC16F628A

This robot vehicle can be driven over the internet or with a laptop wirelessly up to 500 m. The vehicle has an embedded network camera that transmits a live video to the user so that it can be driven without line of sight. It also has a built-in horn to honk at people on the way. The motion of the vehicle is controlled with the onboard PIC16F628A microcontroller that receives the commands from the remote user through a Linksys WRT54GL router. The communication between the microcontroller and the router is a standard serial interface.

Read more

Playing “Happy Birthday” tune with a PIC Microcontroller

This article describes how to play a melody with microcontrollers. A melody consists of notes that must be played with proper timing gap. Every note has a specific frequency. So if you know the notes that you want to play, then first find out the frequencies of those notes. After that, you can program a microcontroller to generate those frequencies at one of its port with proper timing intervals. You can listen the melody on a piezo buzzer connected to the port pin. This project describes the notes and frequencies to play the popular birthday tune.

Read more
« Older Entries Recent Entries »