Tag Archives: PIC16F887


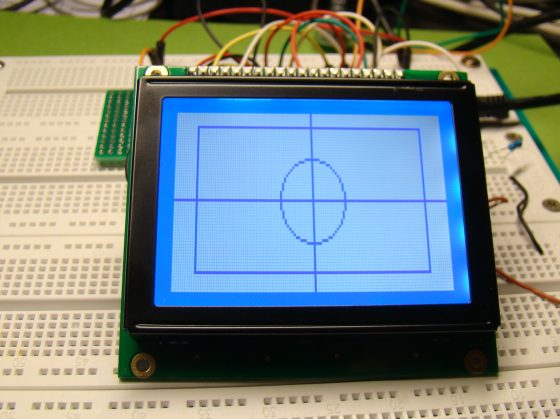
Lab 20: Interfacing a KS0108 based Graphics LCD (Part 2)

In the first part of this tutorial, we discussed about Winstar’s WDG0151-TMI GLCD module, which is a 128×64 pixel monochromatic display built with KS0108B and KS0107B compatible display controllers. The module was interfaced to a PIC16F887 microcontroller and a test program was written in C to demonstrate how to implement the KS0108 instruction set in the firmware of PIC to activate display pixels on the screen. We wrote our subroutine programs that would turn the GLCD on, move the display location to a specified row and column, and draw a pixel at a given coordinates. You might have realized it by now that how much of effort is required to write the firmware for just plotting a point on a GLCD screen. Today’s discussion will focus more on using the built-in GLCD library routines of mikroC Pro for PIC compiler, which will make your life a lot easier if you are using a graphical LCD in your project.

Using MikroC Pro for PIC GLCD library

Read more

Lab 20: Interfacing a KS0108 based Graphics LCD (Part 1)

The use of a graphical LCD (GLCD) drastically changes the look of your project. It provides more freedom for presenting data than the HD44870 based character LCDs. Today we will see how to interface a KS0108 (name of the display controller chip) based GLCD to a PIC microcontroller. This experimental tutorial is divided into two parts. In the first part, we will see how to write a firmware for the PIC microcontroller to initialize the GLCD and send data to plot points and lines on the screen. The second part will focus more on exploring the built-in GLCD Library of mikroC Pro for PIC compiler to display more complex texts and objects. Since GLCDs are real resource hungry devices (in terms of required I/O pins and memory), a bigger size PIC microcontroller (PIC16F887, which has 36 I/O pins and 14KB flash memory) is selected for this experiment. I am using MikroElektronika’s UNI-DS6 development board to demonstrate this project, but the circuit setup can also be made on a breadboard.

Interfacing a 128x64 pixels GLCD

Read more

MikroElektronika’s “Ready for PIC” board talks to “Processing”

Ready for PIC is one of MikroElektronika‘s compact prototyping boards for 28 and 40 pin PIC microcontrollers. The board comes with PIC16F887 microcontroller which is preprogrammed with an UART bootloader firmware and thus eliminates the need of an external programmer. The on-board USB-UART module allows the serial data transfer between the PIC and a PC using an USB cable. It has also got a reasonable size prototyping area to add more functionalities to the board as required. These features make this board an ideal candidate for doing embedded projects that require PC interfacing. This article first reviews the basic features of the Ready for PIC board and then demonstrates how to write a PC application in Processing (an open source programming language) to communicate with the board through the on-board USB-UART module.

Ready for PIC board and PC interfacing using Processing

Read more

In-Circuit Debugging of PIC microcontrollers

An In-Circuit Debugger (ICD) is a very powerful and effective tool for real-time debugging of a microcontroller-based system at hardware level. It allows you to run, halt and single step the program while the target microcontroller is embedded in the actual circuit. Once halted, the program variables, Special Function Registers (SFRs), RAM and EEPROM locations can be examined and modified in real-time, thus assists the designer in debugging the firmware and hardware together. In this article, I am going to describe the In-Circuit Debugging technique in PIC microcontrollers, and demonstrate the debugging procedure with a test project using the PIC16F887 microcontroller. Although the operation of most ICDs are similar, here I will be using mikroElektronika’s PICFlash with mikroICD device in conjunction with the mikroC Pro for PIC compiler for illustrative purpose.

Use of ICD in debugging PIC programming

Read more