Building wireless sensor applications using Dorji’s DRF5150S and DRF4432S RF modules (Part 1)
|
|
Dorji Applied Technology is a China-based company that primarily focuses on building different types of RF modules that can be easily incorporated in designing wireless data loggers, sensor network, telemetry and other wireless applications. Their products mostly use RF transceiver chips from ADI, Infineon, and Silicon Labs. Some of their RF modules have an additional preprogrammed microcontroller that allows direct interface of selected analog and digital sensors to the module. This means you don’t need any external MCU or to write codes for these sensors. I have been playing with their DRF5150S and DRF4432S RF modules for past couple weeks and I should admit that they are very versatile and easy to use. In this blog post, I will describe these two modules briefly, and illustrate how to put them together to construct a simple wireless sensor application where data from a remote sensor are received and displayed on a PC, without using any external microcontrollers.
DRF5150S transmitter module
DRF5150S is a 433 MHZ ISM band transmitter module based on Infineon’s TDA5150 device, which is a low power, multiband, multichannel ASK/FSK/GFSK RF transmitter chip for the sub 1GHz ISM bands (300-320 MHz, 425-450 MHz, 863 – 928 MHz) and with RF-output power of up to +10 dBm. The DRF5150S module has also got an ultra-low power STM8L151 microcontroller on board that is preprogrammed to control the overall operation of the transmitter. The module operates from 2.1-3.6V. The power supply and input/output pins are brought out to 0.1″ male header pins to make prototyping easier. The module can be configured to operate in one of the following two modes:
1. Data transmission mode
In data transmission mode the DRF5150S module acts as a normal data transmitter. It receives data from a host MCU through a standard UART serial port and then sends them out to RF receiving module. The receiving RF module that can be used with DRF5150S is DRF4432S. We will talk about that later. The DRF5150S also features sleep mode during which no data is transmitted and the module consumes only 1.5µA of current.
2. Sensor data mode
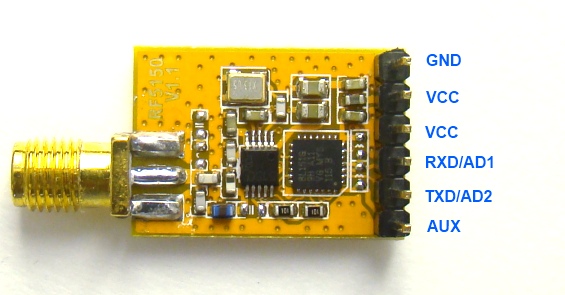
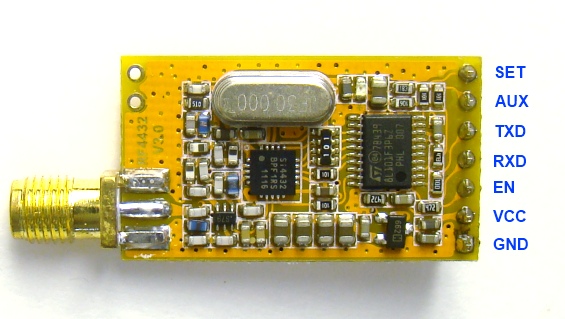
The preprogrammed STM8L151 microcontroller on board allows you to connect selected digital and analog sensors directly to the DRF5150S module, which is a very nice feature of it. In this mode, the DRF5150S transmits the sensor data continuously at a preset interval along with its ID and the battery voltage information. The ID is useful to identify the source of transmission when there is more than one DRF5150S modules transmitting. The ID is divided into two parts: Group ID and Slave ID. The Group ID of the receiving module (DRF4432S) should match with the Group ID of the transmitting module otherwise the receiver will ignore the transmitted data. However, multiple DRF5150S modules can share the same Group ID, but they should have different Slave ID’s for identification on the receiving end. The module provides a 12-bit ADC channel that allows you to connect analog sensors, such as PT1000, LM34, LM35, TMP35, etc. It also features direct interfacing capability for DS18B20, SHT1X, and SHT2X digital sensors. The following picture shows the DRF5150S module and its pin configurations. The RXD and TXD are UART receive and transmit lines. They do have alternative functions based on the mode of operation.
Configuration tool
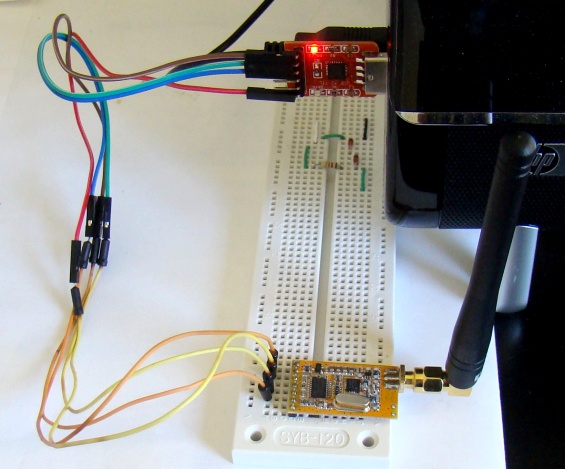
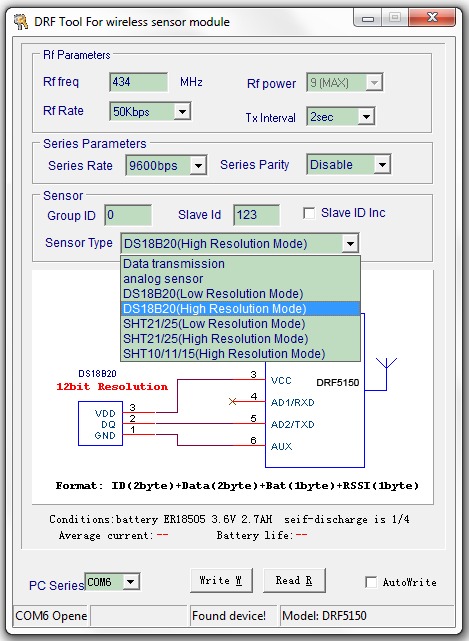
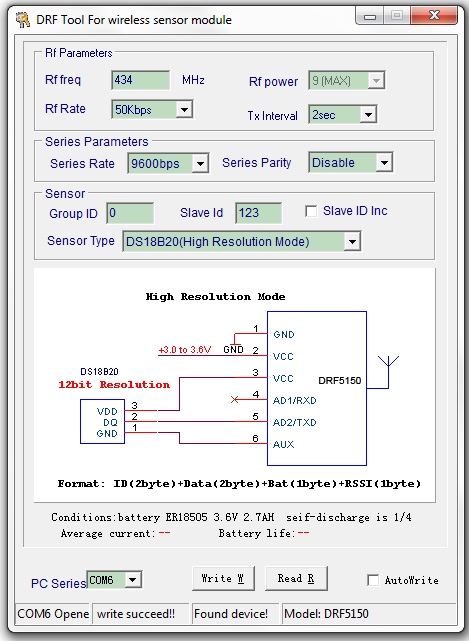
As I mentioned earlier, the DRF5150S provides multiple modes of operation. The module can be configured for a particular mode using a PC software, DRF Tool, downloadable from the Dorji’s website. The DRF Tool is a Windows based GUI application that communicates with the DRF5150S module connected to the PC through an USB-UART adapter. The TXD, RXD, VCC, and GND pins of the DRF5150S module should be connected to the corresponding pins of the USB-UART module. Note that the VCC voltage should be 3-3.6V. Here is a snapshot of the DRF Tool. All supported modes can be seen through the Sensor Type drop-down menu, and you pick one that you want to configure your DRF5150S module to. There are lot of other things that you can do with this tool, such as setting the TX interval, RF frequency and data rate, sensor ID, etc.
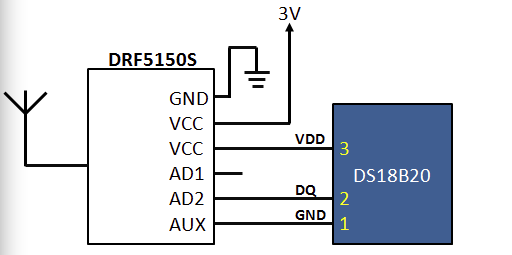
For illustrative purpose we will configure the transmitter module to DS18B20 High Resolution Mode. In this mode, a DS18B20 sensor can be directly interfaced to the DRF5150S module for measuring temperature with high resolution (12-bit). So we will select DS18B20 (High Resolution Mode) from the sensor type drop-down menu and set the transmitting interval to 2 seconds. Rest of the parameters are set as shown above. Now, we click on Write W button to send these configuration settings to the DRF5150S module connected to the PC. The STM8L151 microcontroller on board receives this information and saves into its internal EEPROM. The DRF5150S module is now configured for interfacing the DS18B20 temperature sensor. You should connect the sensor to the RF module as shown below.
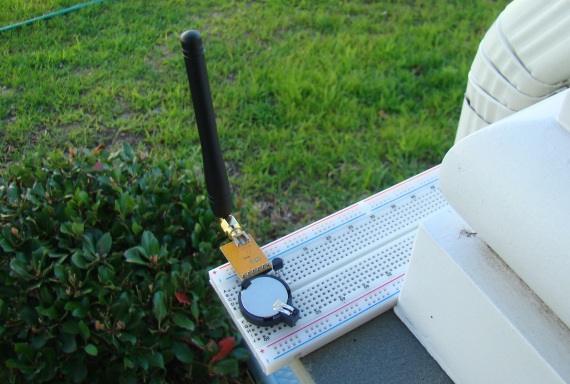
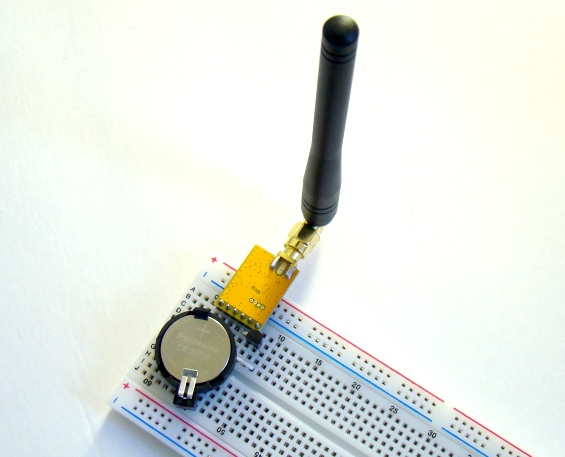
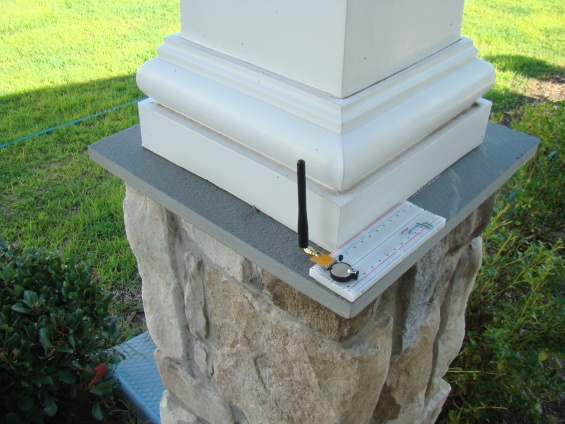
I have made this setup on a breadboard and powered the circuit with a coin cell 3V battery (see the picture above). The DRF5150S reads 12-bit temperature data from the DS18B20 sensor and transmit it (with 2 seconds interval) at 50KBPS data rate using 434 MHz GFSK modulation. The transmitted data format of the DRF5150S is,
ID bytes (Group+Slave) + Data + BAT
The Group and Slave IDs are 1 byte each. The Data is 2 byte long for DS18B20 sensor. The last byte (BAT) contains the information of the battery strength. You can calculate the battery voltage from BAT as,
Battery voltage = (BAT+200)/100
Altogether 5 bytes are transmitted for each temperature sample.
Now lets look at the DRF4432S module which is a matching receiver for the DRF5150S transmitter. In order to make this pair to work together, they must be configured identically.
Dorji’s DRF4432S receiver module
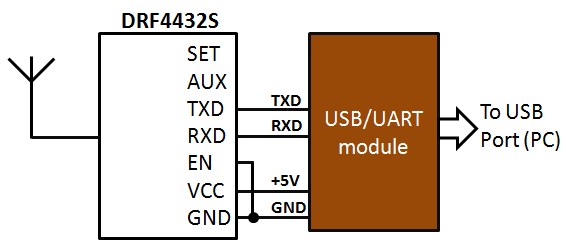
The DRF4432S is a GFSK receiver module based on Silicon Laboratories’ Si4432 wireless ISM transceiver chip. This module is used together with DRF5150S to build wireless sensor applications. It receives data from the DRF5150S transmitter module and transfers it through an UART serial interface. The picture below shows the pin diagrams of the DRF4432S module. Please refer the datasheet to find more details about these pins and their functions.
The DRF4432S module must be configured in the same working mode as its complementary DRF5150S module. The configuration of the DRF4432S is done in the similar way using the DRF Tool. Again you need to connect the DRF4432S to the PC using an USB-UART adapter. Make sure you chose the same parameters in the DRF Tool for the receiver as you did for the transmitter. For our test application, the DRF4432S receiver module is also configured to DS18B20 High Resolution Mode, with RF frequency 434 MHz, RF data rate 50KBPS, and TX interval 2 sec. The transmitting and receiving modules can be configured to operate in a different frequency channel with 200 KHz spacing.
We now interface the DRF4432S to the PC through the USB-UART adapter so that the received data bytes can be transferred to the PC. A PC application is developed using Processing language, which receives the data and displays them on screen. The Enable (EN) pin of the DRF4432S must be pulled low in order for it to work. If the EN pin is pulled high, the receiver goes in to sleep mode. Since the DRF4432S has got an on-board 3.3V regulator, it can operate from 3.4V to 5.5V.
The output data format of the DRF4432S receiver is
ID (group ID + slave ID) +Data + Bat + RSSI
It is same as that of the transmitter module except there is an additional byte (RSSI) which gives the field strength of received signal. The higher value of RSSI means more reliable wireless link. The product datasheet says if RSSI < 64 at 50Kbps RF data rate, then the field strength is considered weak and the probability of package loss is high. N
Processing application
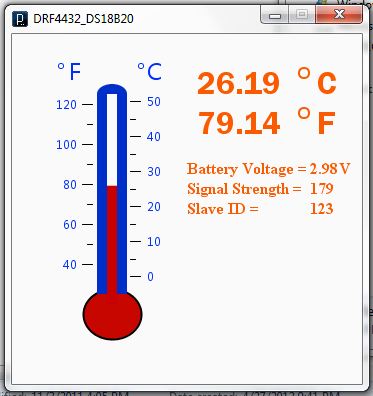
The following Processing code is written to receive six bytes of data from the DRF4432S receiving module connected to the PC through an USB-UART interface. Information like temperature of the remote station as sent by the DRF5150S module, slave ID of the remote transmitting module, the battery voltage on the transmitting side, and the strength of the RF link between the transmitter and the receiver are extracted and displayed on the computer screen.
/*
 Project:     Wireless sensor application using DRF5150S and DRf4432S
 Written by:  Rajendra Bhatt (www.embedded-lab.com)
 Date:        2012/08/2
*/

//import Serial communication library
import processing.serial.*;

// Variable declaration
PFont font22, font44, font14;
PFont font12;
float tempC;
float tempF;
float y, h, BattV,Slave_ID, Byte1, Byte2, Byte3, Byte4, Byte5, Byte6, RSSI;
Serial USB_UART;
int i, j, xx=-15;

void setup() {
  // Define size of window
  size(350, 350);
  //setup fonts for use throughout the application
  font22 = loadFont("MicrosoftYaHei-22.vlw");
  font12 = loadFont("MicrosoftYaHei-12.vlw");
  font44 = loadFont("FranklinGothic-Demi-32.vlw");
  font14 = loadFont("TimesNewRomanPS-BoldMT-16.vlw");
  //init serial communication port
  USB_UART = new Serial(this, "COM6", 9600);
}

void draw() {
  while (USB_UART.available() > 0)
 {
  Byte1 = USB_UART.read();
  delay(20);
  Byte2 = USB_UART.read();
  delay(20);
  Byte3 = USB_UART.read();
  delay(20);
  Byte4 = USB_UART.read();
  delay(20);
  Byte5 = USB_UART.read();
  delay(20);
  Byte6 = USB_UART.read();
  background(250, 250, 250); // Light blue color
  fill(200, 6, 0);
  smooth();
  stroke(0);
  strokeWeight(2);
  ellipse(100, 280, 58, 50);
  noStroke();
  fill(0, 46, 200);
  arc(100, 60, 30, 20, PI, PI+PI);
  rect(85,60,30,200);
  fill(250,250, 250);
  rect(95,60,10,200);

  // Marks on thermometer
  stroke(0);
  strokeWeight(1);
  textAlign(RIGHT);
  fill(0,46,250);
  for (int i = 0; i < 5; i += 1) {
   line(70, 230-40*i, 80, 230-40*i);
   if(i < 4) line(75, 210-40*i, 80, 210-40*i);
   textFont(font12);
   text(str(40+20*i), 65, 235-40*i);
  }

 textAlign(LEFT);
 for (int i = 0; i < 6; i += 1) {
  line(118, 242-35*i, 128, 242-35*i);
  if(i < 5) line(118, 225-35*i, 123, 225-35*i);
  textFont(font12);
  text(str(0+10*i), 135, 247-35*i);
 }

 noStroke();
 fill(0,46,250);
 textFont(font22);
 textAlign(LEFT);
 text("F", 57, 46);
 text("C", 135, 46);
 textFont(font12);
 text("o", 45, 35);
 text("o", 125, 35);
 fill(250,90,0);
 textFont(font22);
 text("o", 300+xx, 45);
 text("o", 300+xx, 85);

// DS18B20 conversion
 tempC = Byte4*256+Byte3;
 tempC = tempC/16;
 BattV = (Byte5+200)/100;
 Slave_ID = Byte2;
 tempF = ((tempC*9)/5) + 32; textFont(font44);
 RSSI = Byte6;
 text(nfc(tempC, 2), 200+xx, 60);
 text(nfc(tempF, 2), 200+xx, 100);
 text("C", 320+xx, 60);
 text("F", 320+xx, 100);
 textFont(font14);
 text("Battery Voltage =        V", 190+xx, 140);
 text(nfc(BattV, 2), 313+xx, 140);
 text("Signal Strength =      ", 190+xx, 160);
 text(nfc(RSSI,0), 313+xx, 160);
 text("Slave ID =      ", 190+xx, 180);
 text(nfc(Slave_ID,0), 313+xx, 180);

 // Raise mercury level
 fill(200,0, 0);
 y = -2.0*tempF + 310;
 h = 270-y;
 rect(95, y, 10, h);
}
}
Download Processing source code and executables for different platforms (Windows, Linux, MacOS)
Output
I tested the setup by putting the DRF5150S sensor transmitter module in the front door porch of my house and the receiver module is connected to the PC in my spare bedroom on the second floor. The distance between the two is around 70 feet no line-of-sight. The received signal strength is found to be 179 (out of 255), which is really good.
Summary
DRF5150S and DRF4432S are two complimentary GFSK RF transmitter and receiver modules working in 433 MHz ISM band and are manufactured by Dorji Applied Technology. The presence of a pre-programmed microcontroller on board allows to connect selected analog and digital sensors directly to the DRF5150S module, which collects data from the sensor and sends out to the DRF4432S module at a configurable interval. The transmitter and the receiver can be both configured to operate for a particular sensor type through a PC software. For illustrative purpose, we constructed a very simple wireless sensor application where the DRF5150S module read 12-bit temperature data from a DS18B20 sensor and transmitted it continuously at an interval of 2 seconds. The DRF4432S receiver successfully received the temperature, ID, and Battery strength bytes sent by the DRF5150S module and transferred the data to a PC through an USB-UART interface. A Processing application was developed to display the received data on computer screen. More features and applications of these two RF modules will be explored in the second part of this tutorial. So stay tuned!
Update: For the list of distributors and sellers of Dorji’s products, visit: http://www.dorji.com/contact.html
|
|

Hi there, which is the maximum range you can obtain with this kit?
Thanks
hello. thank you for this application .I am interested in this prototype. I find diffculties to send the sensor information to my arduino via rdf 5150. I want to know if I am forced to add an ADC to convert to digital .if yes give them realize how this sensor. thank you very much
Pingback: En passant sur le web ← Unknow
Hello
Great tutorial:) Cant wait for the second part, hope you will relesase it soon,
Just waiting for the DS18B20 and the coincell holder:P
BTW
Dorji got a sweet deal on Ebay: 2pcs Tx and one RX plus the USB uart bridge:) 60USD and free shipping:)
Peace
Pingback: Wireless sensors without a microcontroller
OK – I found them on ebay. No luck with Digi-Key or Mouser, my normal haunts. Thanks…..Paul
Raj…..Another great project I’m excited to try out. Where did you purchase these units. My Google search came up empty for a sales source.
Thanks….Paul
Pingback: Wireless sensors without a microcontroller | How to
Pingback: Wireless sensors without a microcontroller | vis a vis | visual mind
Pingback: Wireless sensors without a microcontroller - Hack a Day