Netduino Day 6 – Read SD card and send info to a Serial Port

|
|
In our earlier tutorial, Writing to an SD Card, we learned to write to an SD card. As you might have experienced, in order to see what’s been written, we need to pop out the SD then connect it to a computer, which obviously is not very convenient all the time. So, in this tutorial we will read a text file (same file/information that we wrote in previous tutorial) and send that text to a computer. Our communication between Netduino SD card and Computer is established via Serial Communication using USB to UART-TTL device. So, the information will be transferred to a computer in a Component Object Model (COM) port.
There are two major parts of this tutorial; first reading the data from SD Card and sending it to a computer, second an application listening to a COM port to retrieve the data. Besides these, in this tutorial we will touch on following major objects:
- Serial Communication
- InterruptPort
- EventHandler (Native and SerialDataReceived)
- StreamReader
Circuit Setup and Theory
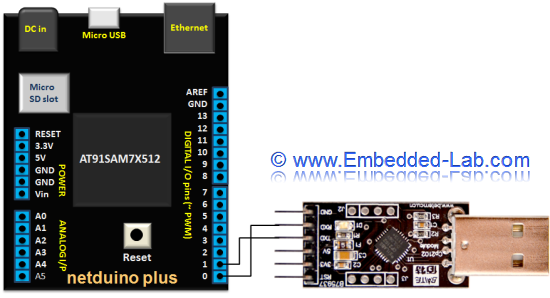
Since the computer I am using doesn’t have a serial port (most of the computer these days don’t have one) so a USB UART (Universal Asynchronous Receiver-Transmitter) adapter (purchased here) is used which enable us to send serial data to a computer via a USB.
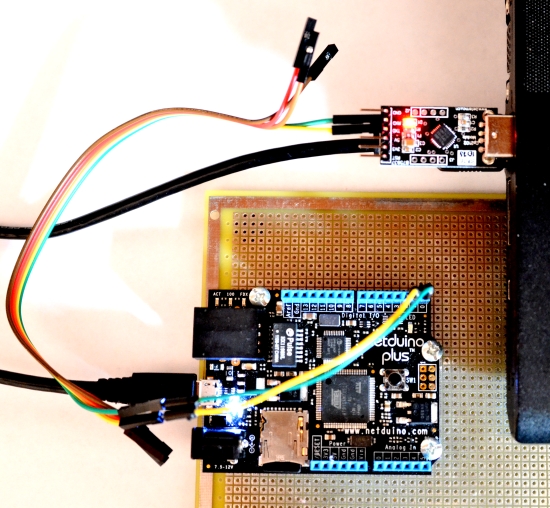
Netduino natively supports UART RX and TX on pins digital 0 and 1 pins. So, the pin 0 of Netduino goes to RXD and pin 1 is connected to TXD of the USB-UART device. When the information is sent from Netduino to USB UART device, we need a computer application to harness that information from the COM port. In order to receive such information I wrote a COM Talk tool.
COM Talk (Computer Application)
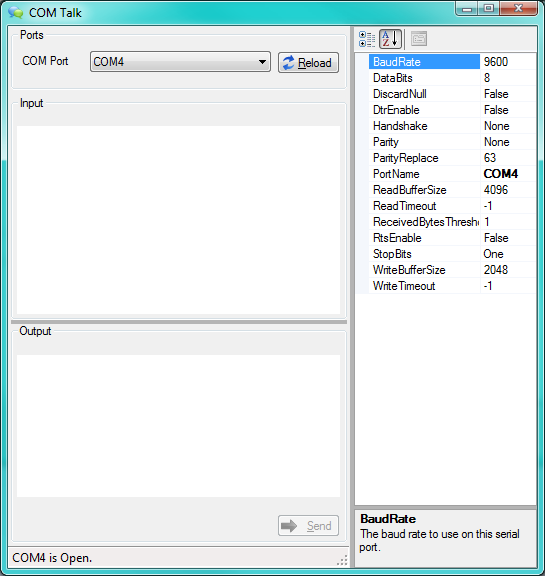
Let’s create an application that can receive information from COM ports. I also added some functionality so that it can send information via selected COM port, however, we will not discuss on that part. I will not go into the details about how this tools works as it is more .NET stuff (than programming on microcontroller). This application can be used to receive information on any COM port so it’s not limited to this tutorial. This is how the UI of this tool looks like.
The Input section of COM Talk will show the information received in selected COM port. Internally, bytes received are converted to string and displayed. The Output section allows sending information to COM port. This section is not used in the tutorial. We need to have this tool running whenever we want to receive data on a COM port.
Here’s the entire code related to this COM Talk.
public partial class COMInteractionForm : Form { #region Constructor public COMInteractionForm() { InitializeComponent(); selectedSerialPort = new SerialPort(); InitializeEvents(); } #endregion #region Private Methods private void InitializeEvents() { this.Icon = Properties.Resources.Talk; this.buttonReloadCOMs.Click += new EventHandler(buttonReloadCOMs_Click); this.selectedSerialPort.DataReceived += new SerialDataReceivedEventHandler(selectedSerialPort_DataReceived); this.comboBoxCOMPorts.SelectedValueChanged += new EventHandler(comboBoxCOMPorts_SelectedValueChanged); LoadAvailableCOMPorts(); this.buttonSend.Click += new EventHandler(buttonSend_Click); this.richTextBoxOutput.TextChanged += new EventHandler(richTextBoxOutput_TextChanged); this.FormClosing += new FormClosingEventHandler(COMInteractionForm_FormClosing); this.labelEmbeddedLab.Click += new EventHandler(labelEmbeddedLab_Click); } private void LoadAvailableCOMPorts() { if (!COMPortsExists()) return; this.comboBoxCOMPorts.Items.Clear(); foreach (string portName in SerialPort.GetPortNames()) { this.comboBoxCOMPorts.Items.Add(portName); } this.comboBoxCOMPorts.SelectedItem = SerialPort.GetPortNames()[0]; } private bool COMPortsExists() { if (SerialPort.GetPortNames().Length 0; } private void buttonSend_Click(object sender, EventArgs e) { selectedSerialPort.WriteLine(this.richTextBoxOutput.Text); } private void COMInteractionForm_FormClosing(object sender, FormClosingEventArgs e) { ClosePort(true); } private void labelEmbeddedLab_Click(object sender, EventArgs e) { System.Diagnostics.Process.Start("http://www.Embedded-Lab.com"); } #endregion #region Fields private SerialPort selectedSerialPort; private string textReceived; #endregion } |
C#.NET Program
Let’s change the gear and learn how we can send information to a COM port from a Netduino. As mentioned earlier, Netduino has some dedicated Digital I/O for serial communication and we are going to use digital port 0 and port 1 of Netduino. The code is written in such a way that it will only send the text file information when the on board button is pressed.
To facilitate the information transmission via a serial port there are Reader and SDCard classes created.
Reader Class
The Reader class basically uses StreamReader and calls its ReadToEnd method.
public class Reader { #region Constructor public Reader(string textFileFullPath) { TextFileFullPath = textFileFullPath; } #endregion #region Public Methods public string Read() { string text; try { using (StreamReader reader = new StreamReader(TextFileFullPath)) { text = reader.ReadToEnd(); } } catch (Exception e) { throw new Exception("Failed to read " + e.Message); } return text; } #endregion #region Private Properties private string TextFileFullPath { get; set; } #endregion } |
SDCard Class
We don’t actually need an SDCard class however I am making one as we can easily add more and more functionality to this class. This class basically comprises two public properties.
public class SDCard { #region Constructor public SDCard() { } #endregion #region Public Properties public string RootPath { get { return "SD"; } } public bool Readable { get { return System.IO.Directory.Exists(RootPath); } } #endregion } |
Now, we have these two helper classes defined; let’s look at our main program. In the Main method, we have created some instances of OutputPort, SerialPort, InterupPort, and subscribed to NativeEventHandler for OnInterrup event of on board button, and also to DataReceived event of SerialPort class. We then open up the serial port and let the main thread to sleep forever.
public static void Main() { onBoardLed = new OutputPort(Pins.ONBOARD_LED, false); port = new SerialPort(SerialPorts.COM1, 9600, Parity.None, 8, StopBits.One); bufferSize = new byte[2048]; InterruptPort onBoardButton = new InterruptPort(Pins.ONBOARD_SW1, false, Port.ResistorMode.Disabled, Port.InterruptMode.InterruptEdgeBoth); onBoardButton.OnInterrupt += new NativeEventHandler(button_OnInterrupt); port.DataReceived += new SerialDataReceivedEventHandler(port_DataReceived); if (port.IsOpen) port.Close(); port.Open(); Thread.Sleep(Timeout.Infinite); } |
The moment, we press the on board button, an interrupt event will get fired. Since we have subscribed to that event, program will jump to the following event handler;
private static void button_OnInterrupt(uint data1, uint data2, DateTime time) { if (data2 == 0) // button pressed? { onBoardLed.Write(true); string filePath = "Report" + Path.DirectorySeparatorChar + "Log.txt"; string data = ReadDataFromFile(filePath); if (data != null) SendDataUsingCOMPort(System.Text.Encoding.UTF8.GetBytes(data)); onBoardLed.Write(false); } } |
The second argument in above code, data2, contains the state of the button. The value of data2 becomes 0 when the button is pressed. So, at this state (data2 equals to 0) we need to read the text file and then send the information to a serial port. As it can be seen, the routine first calls ReadDataFromFile function by passing the path of the file to read to get the text file content.
In the ReadDataFromFile function, it first creates an instance of an SDCard class then creates another instance of Reader class, only when SD card is readable. The Read method of reader class return the text of the given text file path.
private static string ReadDataFromFile(string filePath) { SDCard sdCard = new SDCard(); if (sdCard.Readable) { Reader reader = new Reader(sdCard.RootPath + Path.DirectorySeparatorChar + filePath); return reader.Read(); } return null; } |
Now, in the button_OnInterrupt method, we can see, it then calls SendDataUsingCOMPort and passes the corresponding bytes of the text that was read from SD card. In the SendDataUsingCOMPort we simply call the Write method of the serial port.
private static void SendDataUsingCOMPort(byte[] data) { port.Write(data, 0, data.Length); } |
Output
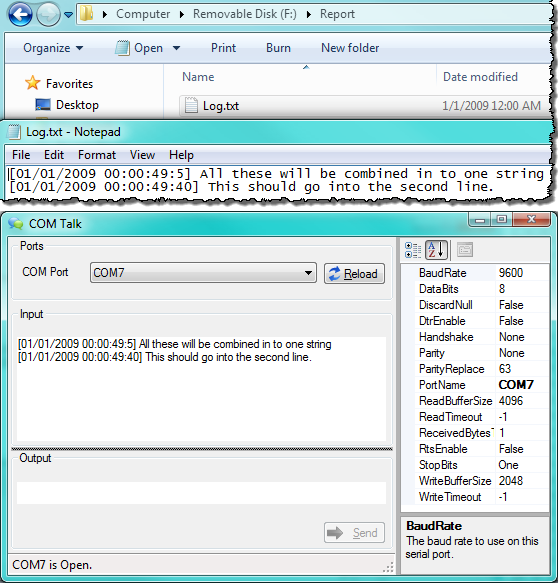
Using the SerialPort class we were able to send the data to COM1 of Netduino by calling Write method. And the COM Talk standalone program was able to faithfully display the incoming data to a COM port.
Here is a small video of sending data from Netduino to computer.
Download
|
|


Pingback: Tutorial Netduino Parte 6 « Soloelectronicos
Great post. I used to be checking continuously this weblog and I
am impressed! Extremely useful info specially the remaining phase :
) I maintain such information much. I used to be looking for this certain information for a very
lengthy time. Thanks and best of luck.