Tag Archives: Netduino Plus


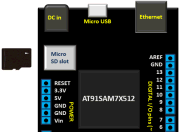
Netduino Day 6 – Read SD card and send info to a Serial Port

In our earlier tutorial, Writing to an SD Card, we learned to write to an SD card. As you might have experienced, in order to see what’s been written, we need to pop out the SD then connect it to a computer, which obviously is not very convenient all the time. So, in this tutorial we will read a text file (same file/information that we wrote in previous tutorial) and send that text to a computer. Our communication between Netduino SD card and Computer is established via Serial Communication using USB to UART-TTL device. So, the information will be transferred to a computer in a Component Object Model (COM) port.

Text file content form SD card

There are two major parts of this tutorial; first reading the data from SD Card and sending it to a computer, second an application listening to a COM port to retrieve the data. Besides these, in this tutorial we will touch on following major objects:

  • Serial Communication
  • InterruptPort
  • EventHandler (Native and SerialDataReceived)
  • StreamReader

Read more

Netduino Day 5 – Writing to an SD Card

Expandable memory is always a plus no matter whether it’s a Phone, Camera or a Microcontroller. Even advantageous if we know how to use it. In this fifth day Netduino tutorial, we will learn a few writing operations about an SD card. We will learn how to write to a text file, shown as an example of writing a log. The Logger class is also capable of creating a text file at any given location then writing some text information to it.

SD Card in Netduino Plus

Read more

Netduino Day 3 – Multiplexed Seven-Segment LED displays

Seven Segments LED leg Names

A visual output always adds value to any project. In this third day tutorial, we are going to display some numeric, alphabetic as well as two symbolic characters on a 4-digit seven segment LED module. The way we are interfacing the seven segments LEDs is known as multiplexing, which allows to save some I/O pins of Netduino as compared to driving them individually. The seven segment LEDs are resource and power hungry, but we are going to do this experiment just to get our feet wet in the microcontroller or embedded world and to understand the basics of a seven segments LED displays.

Seven Segments LED displaying Letter 'A'

Read more

Netduino Day 2: Interfacing a Character LCD

Liquid Crystal Displays (LCD) are a great choice of output device for displaying alphanumeric characters in real time. They are also very useful if your project requires an interactive user interface for data input. Besides, they are inexpensive, consume less power than LED displays, and give a more professional look to your project. Today we will explore how to interface an HD44780 based character LCD to Netduino to display alphanumeric characters. For technical details of the HD44780 driver, please read its datasheet as well as its interfacing example with chipKit.

Information displayed on Character LCD

Read more

Netduino Day 1: Basic Input and Output

We will start our Netduino tutorial series with a very basic project of flashing an LED. The objective of this project is to explore basics of Netduino I/O pins as well as to make sure that everything is setup correctly, including software installation and hardware setup. In this project, we will use an Analog pin to read a potentiometer’s analog output, and a digital pin to flash an LED. The frequency of LED blinking is varied based on the potentiometer output. It will blink at an interval of 10 milliseconds to 1000 milliseconds based on the wiper position of the potentiometer. In Netduino, you can set the range for 10-bit ADC output of an analog port.Writing code will be carried out in Visual Studio with C# as programming language.

Netduino based Flashing LED

Read more

« Older Entries