Author Archives: ANir

Netduino Day 4 : Eight Digit Seven Segment LED Display with MAX7219

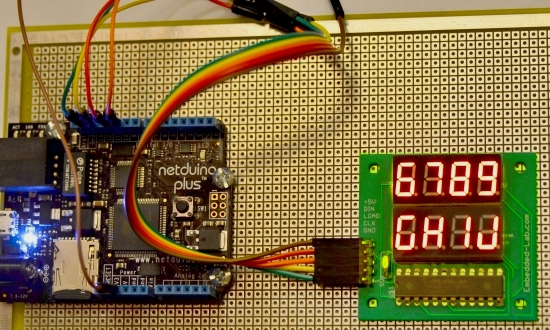
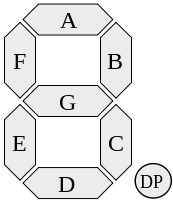
In Day 3 tutorial, we learnt basics of seven segment LED displays and discussed about a time-division multiplexing technique that reduces the number of required microcontroller I/O pins to drive multiple seven segment LED displays. Today we will move a step further and discuss about a serial interface (SPI) for driving 8 seven segment LED displays. The technique uses MAXIM’s MAX7219 LED driver chip that allows you to control 8 (or more in cascade configuration) common-cathode seven segment LED displays with only 3 I/O pins of Netduino. For illustrative purpose, we will use our 8-digit serial seven segment LED (8DSSSLED) display module here. The benefit of using MAX7219 is, it will do all the hard work of multiplexing operation and let the microcontroller do more important jobs. It supports SPI serial communication protocol.

Netduino controlling 8 Digit Serial Seven Segments LED using MAX7219

Read more

Netduino Day 3 – Multiplexed Seven-Segment LED displays

Seven Segments LED leg Names

A visual output always adds value to any project. In this third day tutorial, we are going to display some numeric, alphabetic as well as two symbolic characters on a 4-digit seven segment LED module. The way we are interfacing the seven segments LEDs is known as multiplexing, which allows to save some I/O pins of Netduino as compared to driving them individually. The seven segment LEDs are resource and power hungry, but we are going to do this experiment just to get our feet wet in the microcontroller or embedded world and to understand the basics of a seven segments LED displays.

Seven Segments LED displaying Letter 'A'

Read more

Netduino Day 2: Interfacing a Character LCD

Liquid Crystal Displays (LCD) are a great choice of output device for displaying alphanumeric characters in real time. They are also very useful if your project requires an interactive user interface for data input. Besides, they are inexpensive, consume less power than LED displays, and give a more professional look to your project. Today we will explore how to interface an HD44780 based character LCD to Netduino to display alphanumeric characters. For technical details of the HD44780 driver, please read its datasheet as well as its interfacing example with chipKit.

Information displayed on Character LCD

Read more

Netduino Day 1: Basic Input and Output

We will start our Netduino tutorial series with a very basic project of flashing an LED. The objective of this project is to explore basics of Netduino I/O pins as well as to make sure that everything is setup correctly, including software installation and hardware setup. In this project, we will use an Analog pin to read a potentiometer’s analog output, and a digital pin to flash an LED. The frequency of LED blinking is varied based on the potentiometer output. It will blink at an interval of 10 milliseconds to 1000 milliseconds based on the wiper position of the potentiometer. In Netduino, you can set the range for 10-bit ADC output of an analog port.Writing code will be carried out in Visual Studio with C# as programming language.

Netduino based Flashing LED

Read more

Getting Ready for Netduino / Netduino Plus Tutorials

Netduino

There are a few things that need to be done besides simply connecting the Netduino to the computer. I will be using Netduino Plus for the tutorials however Netduino and Netduino Plus are more or less the same for our tutorials. Let’s first list all the necessary tidbits:

  • Microsoft Visual Studio (C# or VB) Express 2010


  • .NET Micro Framework SDK v4.1


  • Netduino SDK v4.1.0


  • Netduino or Netduino Hardware


  • Basics electronics board and components.
  • It’s hard to list but at the minimum we will need a computer (of course), breadboard, connecting wires, LEDs, resistors, etc.


Once you have all these installed/accessed, plug your Netduino to your computer, and start your Visual Studio.  When Visual Studio is started for the first time it may ask you a few things, such as the language (VB or C#) that you are comfortable with.


Visual Studio

Visual Studio (VS) that I have installed is configured for CSharp.NET so when I start a Visual Studio and try to create a new project, it automatically selects CSharp (C#) section. To create a new project, from VS go to File > New > Project, this will display a New Project file open dialog-box, as shown below. Under C# and Micro Framework, highlight Netduino Application or Netduino Plus Application and give Name, Location then click OK button. (I will be using Netduino Plus.)

New Project Window Visual Studio

New Project dialog of VS

Read more

Recent Entries »