Category Archives: chipKIT


chipKIT Project 1: Digital thermometer using an LM34 sensor

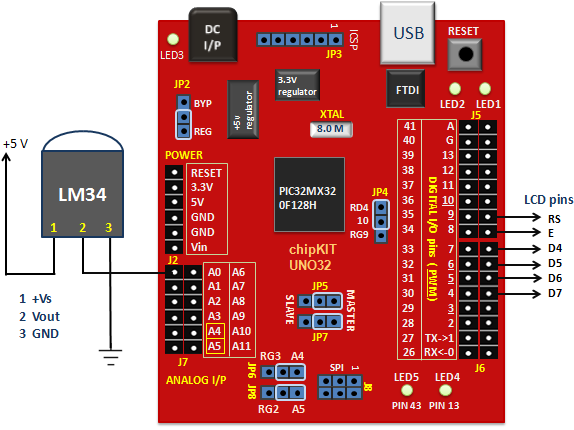
In Tutorial 3, we learnt how to use chiKIT ADC channels to read an external analog voltage and convert it into a digital number. We also discussed about interfacing a standard Hitachi 44780-based character LCD to the chipKIT Uno32 board in Tutorial 4. Now it’s time to implement the knowledge we have gained so far to make our first practical application using chipKIT, which is a digital thermometer. Since temperature is a non-electrical entity, the first thing we need is a transducer or sensor to convert it into an electrical signal. In this project, we will use the LM34 sensor

Read more

chipKIT Tutorial 4: Interfacing a character LCD

Liquid Crystal Displays(LCDs ) are a very popular output device for displaying graphical and alphanumeric data in microcontroller based systems. They can also provide an interactive input interface to the users. The most common type of LCD controller used by hobbyists is the Hitachi 44780, which provides a relatively simple interface between a processor and an LCD. The purpose of this tutorial is to describe how to interface Hitachi 44780–based LCDs with the chipKIT Uno32 board to display alphanumeric information.

Read more

chipKIT Tutorial 3: Analog-to-digital conversion

We live in an analog world where most physical variables are analog signals. However, a microcontroller can only process data that is available in digital format. It is precisely for this reason that the analog-to-digital conversion (ADC) is so important in embedded systems that interact with an analog environment. In this tutorial, we will discuss about the ADC capabilities of chipKIT UNO32 board and illustrate how to read an analog input signal from its ADC channels.

Read more

chipKIT Tutorial 2: Serial communication with PC

The PIC32 processor on the chipKIT Uno32 board provides two hardware serial ports. One of these is used by the on-board FTDI chip to create an USB-UART interface that allows the MPIDE tool running on the PC to communicate with the Uno32 board through an USB port. In this tutorial, we will use the same USB-UART interface to demonstrate a two-way asynchronous serial communication between the Uno32 and the PC. The Uno32 board receives a serial command through the PC’s USB port to turn an external LED on and off. In return, the Uno32 board acknowledges to the PC by

Read more

chipKIT Tutorial 1: Digital input and output

Our first chipKIT tutorial is about reading and writing digital data (0 or 1) from and to an I/O pin of the chipKIT board. Digital inputs are useful to determine whether an incoming digital signal is logic HIGH or logic LOW. A simple application of digital input is reading the state of a push-button switch and perform some action based on if the switch has been pressed or not. Similarly, digital outputs are used by microcontrollers for many purposes, such as to enable or disable an external chip, drive LEDs and LCD displays, control relay switches, etc. In this tutorial,

Read more
« Older Entries Recent Entries »