Getting Ready for Netduino / Netduino Plus Tutorials
|
|
There are a few things that need to be done besides simply connecting the Netduino to the computer. I will be using Netduino Plus for the tutorials however Netduino and Netduino Plus are more or less the same for our tutorials. Let’s first list all the necessary tidbits:
- Microsoft Visual Studio (C# or VB) Express 2010
- http://www.microsoft.com/visualstudio/eng/products/visual-studio-express-products
- Using this software we will be writing our codes in VB.NET or C#.NET.
- .NET Micro Framework SDK v4.1
- http://www.netduino.com/downloads/MicroFrameworkSDK.msi
- Without this, we will not be able to write code that Netduino (or any Micro Framework supported hardware) will understand.
- Netduino SDK v4.1.0
- 32 bit : http://www.netduino.com/downloads/netduinosdk_32bit.exe
- 64 bit : http://www.netduino.com/downloads/netduinosdk_64bit.exe
- This SDK will enable us to write Netduino specific codes.
- Netduino or Netduino Hardware
- http://www.netduino.com/buy/?pn=netduinoplus
- This is our main microcontroller where we will deploy our code and it will perform as we have written.
- Basics electronics board and components.
- It’s hard to list but at the minimum we will need a computer (of course), breadboard, connecting wires, LEDs, resistors, etc.
Once you have all these installed/accessed, plug your Netduino to your computer, and start your Visual Studio. When Visual Studio is started for the first time it may ask you a few things, such as the language (VB or C#) that you are comfortable with.
Visual Studio
Visual Studio (VS) that I have installed is configured for CSharp.NET so when I start a Visual Studio and try to create a new project, it automatically selects CSharp (C#) section. To create a new project, from VS go to File > New > Project, this will display a New Project file open dialog-box, as shown below. Under C# and Micro Framework, highlight Netduino Application or Netduino Plus Application and give Name, Location then click OK button. (I will be using Netduino Plus.)
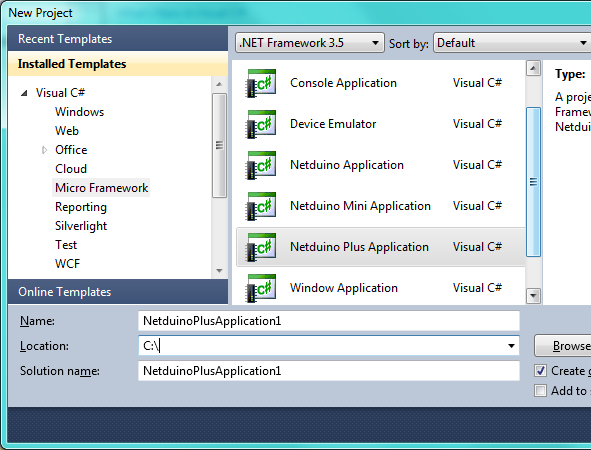
New Project dialog of VS
This will create a new project and we are almost ready to write our code. From the Solution Explorer (View > Solution Explorer), double click the Program.cs. Something like following will show up in the main window.
public class Program { public static void Main() { // write your code here } } |
Public static void Main() is the main entry point in our code. From here we will control how the code will proceed into a next step.
Running code
Before hitting F5 or Debug > Start Debugging, we need to tell VS to put our compiled code to our Netduino. In order to do so, click on Project > ‘yourProjectName’ Properties, which will bring the following type of window:
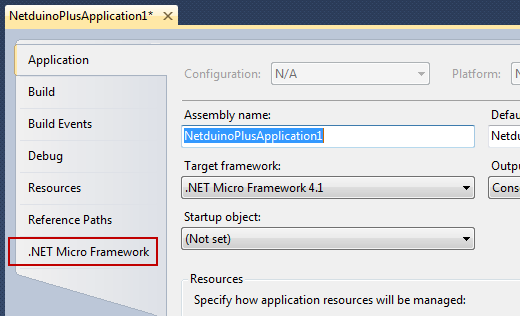
Application tab of a Miro Framework project
From this Project Property window, click on .NET Micro Framework tab then select USB on Transport. Now in Device dropdown, Netduino (or Netduino Plus) should be listed. If your Netduino is not listed make sure you have installed all the components described earlier and also unplug and re-plug the Netduino. The .NET Micro Framework section should look like follow:
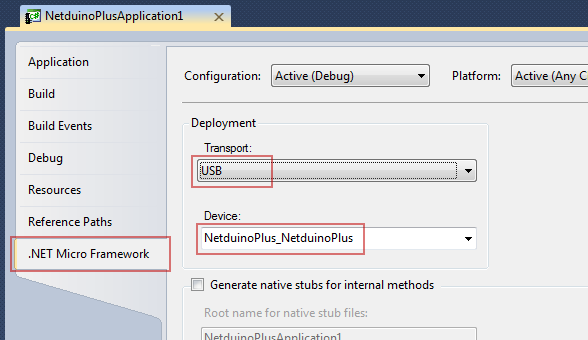
.NET Micro Framework tab of a project properties page
Now we are ready to run (or Debug) our code!
Netduino
“The Netduino is an open source electronics platform using the .NET Micro Framework. It features a 32-bit microcontroller and a rich development environment. The Netduino combines 20 GPIOs with SPI, I2C, 2 UARTs, 4 PWMs, and 6 ADC channels.”
- Atmel 32-bit microcontroller
- 48Mhz, ARM7
- 14 Digital I/O Pins
- 6 Analog Inputs
- Arduino Shield Compatible
- Specs: http://www.netduino.com/netduino/specs.htm

Netduino Board
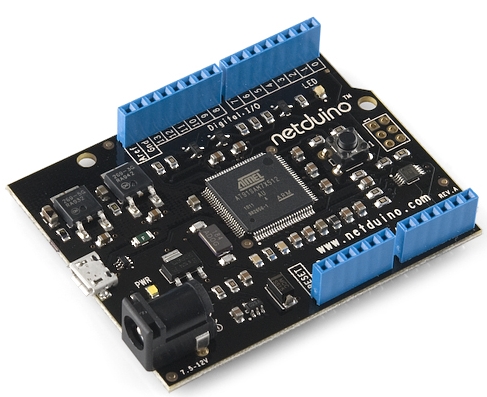
Netduino Plus
“The Netduino Plus is an open source electronics platform using the .NET Micro Framework. The board features a 32-bit microcontroller and a rich development environment… The Netduino plus adds an ethernet connection and an SD socket for even greater functionality.”
- Atmel 32-bit microcontroller
- 48Mhz, ARM7
- 14 Digital I/O Pins
- 6 Analog Inputs
- Ethernet Connection
- SD card socket
- Specs: http://www.netduino.com/netduinoplus/specs.htm

Netduino Plus Board
|
|
Pingback: Blog J.Schweiss | AVR Tutorials