Setting up the CCS v4 build and debug environment for TI MSP430 Launchpad
|
|
Last year, Texas Instruments (TI) released industry’s lowest cost (only $4.30) microcontroller development kit named Launchpad. It is a complete development tool for rapid prototyping with TI’s ultra-low power MSP430 Value Line MCUs. I also bought a Launchpad kit several months ago but haven’t really looked into it. Last weekend, I spent a couple of hours reading about the MSP-EXP430G2 experimenter board (that comes with the Launchpad kit) and the Code Composer Studio (CCS) software tool. CCS is an integrated development environment (IDE) to develop and debug applications for TI’s embedded processor families. As always, a “Hello World” program is the best thing to start with any new development platform. If you ran it successfully, it means you have setup the compiler and the programmer/debugger correctly and you are all set to go. Here’s a step-by-step guide to set up the CCS v4 build and debug environment for the MSP-EXP430G2 experimenter board.

TI's MSP430 Launchpad board
A brief introduction to MSP430 Launchpad
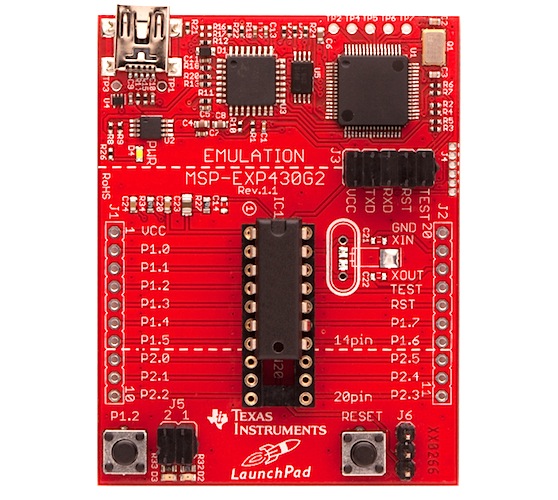
Launchpad is a low cost development solution to get started with TI’s MSP430 Value Line devices. The Launchpad kit includes a MSP430G2 experimenter board, two MSP430G2xx flash microcontrollers (MSP430G2231 and MSP430G2211), a mini USB cable, four 10-pin headers (two male and two female), and a 32.768 KHz external crystal. The total cost of the kit is only $4.30. The experimenter board has an integrated DIP target socket that supports up to 20 pin devices. All of the pins are broken out to the header ports on either side of the board for easy access. The on-board flash emulation tool allows direct interface to a PC through an USB port for easy programming and debugging. The same interface can also be used by the MSP430G2xx device on the board to communicate with the host PC through a 9600 baud UART serial connection (virtual COM port).
There are two LEDs (red and green) on the board that are connected to P1.0 and P1.6 I/O pins. Similarly, two push buttons for user input and device reset are also available on the board.
There are different development tools available to write, download, and debug applications for the MSP-EXP430G2 development board. Code Composer Studio (CCS) is one of them and is also available in a free limited version that allows 16 KB of C-code compilation. This is just enough for experimenting with MSP-EXP430G2 board.

MSP430 Launchpad
Installation of Code Composer Studio v4
Code Composer Studio™ (CCS) is an integrated development environment (IDE) for developing and debugging embedded applications for TI’s various processor families. It includes compilers for each of TI’s device families, source code editor, project build environment, debugger, profiler, simulators and many other features. There are many versions of CCS IDE, but I will be talking about CCS v4, which is a recommended version for MSP430 users. So first you need to go to the CCS download wiki by clicking the following link.
http://processors.wiki.ti.com/index.php/Download_CCS
Then scroll down a little bit and click on the download button, “Download latest production CCSv4 MSP430/C28x code size limited image“, as shown below.

Download the FREE Code Size Limited Tools for MSP430 and C28x
You will be directed to my.TI Account page where you need to log in. If you don’t have a TI account you can create one for free. The link to the installation zip file will be then sent to your email. Click on the link and download the zip file. Unzip it and double click on the file named setup_CCS_MC_Core_x.x.x.x.exe. Follow the installation instructions and select MSP430-only Core Tools option in the Product Configuration dialogue window and click Next. Use the default settings in the Select Components dialog and click Next. Then click Next again in the Start Copying Files dialogue and wait till the installation completes.
Note: By default, Microsoft Windows Vista and Windows 7 do not allow user level accounts to write files in the Program Files directory. This can prevent CCS from starting when installed in the Program Files or Program Files (x86) directory, because CCS stores configuration data by default in its install directory. So it is recommended to install CCS outside the Program Files or Program Files (x86) directory.
Writing a “Hello World” program
The Launchpad experimenter board includes a pre-programmed MSP430G2231 device which is already placed in the target DIP socket. When the board is powered through a USB cable, the preloaded demo program starts and the on-board red and green LEDs toggle in sequence. This is the quickest way of verifying that the Launchpad board is working. But this is not our “Hello World” program. We will first explore the basic features of CCS and see how to create a new project, build the code, and eventually load the program into the flash memory of the MSP430 device on board. Our test program will make the MSP430G2231 device to continuously flash the on-board red LED connected to P1.0 pin.
Step 1: Start CCS by double clicking the icon on the desktop or selecting it from the Windows Start menu. When CCS loads, the first thing it asks is to define a workspace – a directory that holds all elements (projects, links to projects, possibly source code) used in the development. Browse the directory path where you want it to be and do NOT check the Use this as the default and do not ask again checkbox. Click OK.

Select Workspace folder
Step 2: If this is the first time you have opened CCS then a Welcome to Code Composer Studio v4 page appears.

CCS Welcome screen
Close the page by clicking the X on the Welcome tab. You should now see an empty CCS workbench with a C/C++ icon in the upper right hand corner. This is called the C/C++ Perspective and is used to create or build C/C++ projects. When you will be the debugging mode, it will automatically switch to the Debug Perspective. The layout views of the workbench windows, tool-bars, and menus are different for code development and debugging. Therefore, the use of separate perspectives minimizes clutter to the user interface.

Empty CCS workbench in C/C++ Perspective
Step 3: Next step is to create a new project. A project contains all the files you will need to develop an executable output file (.out) which can be run on the MSP430 hardware. To create a new project click: File -> New -> CCS Project
In the Project name field type FlashLED. It will create a new directory called FlashLED inside the Workspace folder (if Use default location is checked), where all the project files will be stored. Click Next.

Creating a new CCS project
Step 4: The next window that appears selects the platform and configurations. The Project Type should be set to MSP430 and the Debug and Release boxes should be checked in the Configurations box. Click Next.

Project type is MSP430
Step 5: The next window is to define inter-project dependencies (if any). There are none now. So select Next.

No inter-project dependencies for now
Step 6: The next step is to select the CCS project settings. Select the Device Variant using the pull-down list and choose MSP430G2231 (target device on the Launchpad experimenter board). This will select the appropriate linker command file, runtime support library, set the basic build options for the linker and compiler, and set up the target configuration.

Select MSP430G2231 for Device Variant
Click Finish and a new project is created. You will now see the C/C++ Projects window contains FlashLED project which is set active.

New project FlashLED added to the C/C++ Projects window
Step 7: At this point, the project does not include any source files. The next step is to add the source files to the project. To add a source file to the project, right-click on FlashLED in the C/C++ Projects window and select: New -> Source File. Name the source file main.c and click Finish.

Add a new source file main.c
Then an empty window will open for the main.c code.

Empty window for main.c
Step 8: Next, we will add code to main.c. Type in or copy and paste the following code into the main.c window. This code is for flashing the red LED connected to P1.0.
#include <msp430g2231.h>
volatile unsigned int i;
void main(void)
{
	WDTCTL = WDTPW + WDTHOLD; 	// Stop watchdog timer
	P1DIR = 0x01; 			// P1.0 is output
	P1OUT = 0x00; 			// LED off
	while(1)
	{
		P1OUT = ~P1OUT; 	// Complement output
		_delay_cycles(500000);  // Delay 50K clock cycles
	}
}
The comments in the code pretty much explains each line of the code. The delay statement is a built-in intrinsic function for generating delays. The only parameter needed is the number of clock cycles for the delay. The while(1) loop repeats the next two lines for ever. After you finish typing the above code into main.c window, save your work.

Save the main.c file after typing up the code
Step 9: Next click the Build button or select Project-> Build Active Project and watch the tools run in the Console window. Check for any errors in the Problems window.

Build and Debug buttons in the toolbar

Console and Problems windows
Step 10: If the build is successful, you are ready to load the program into the target MSP430 device. Make sure that the Launchpad board is connected to the PC. Then click the Debug button (green bug). The Debug Perspective view should open, the program is loaded into the MSP430 device automatically, and you should now be at the start of main().

Debug Perspective
In debug mode, you can run the application in either a single step mode using Step Into and Step Over function buttons or a free run mode by clicking on the Run button (see the picture below).

Debugging menu
If you click on the Run button, the MSP430G2231 processor starts executing the program and the LED on board should blink continuously.
Step 11: At last, terminate the active debug session using the Terminate All button. This will close the debugger and return CCS to the C/C++ Perspective view. CCS will remove the breakpoints and release the MSP430G2231 processor in the board so that it could execute freely the program without the need of the debugger.

Blinking LED at P1.2
Note: The _delay_cycles(500000); statement in the code creates a delay interval of 500000 clock cycles. If you want to convert it into time, you need to know the time period or frequency of the clock. MSP430 devices have multiple sources of clock including internally generated clocks (known as internal digitally controlled oscillator, DCO) and external source (using crystal). On power on reset, the default clock source comes from the internal DCO module. The default value of this clock is around 1.0 MHz (the internal oscillator is not very accurate). So, the _delay_cycles(500000); statement should create a delay of approximately 0.5 sec interval.
References
Various documents and links available at “Getting Started with the MSP430 LaunchPad Workshop”.
|
|
Hi,
I am absolutely new to ccs and microprocessors too. I wanted to ask that what is the language this code is written in( I have learnt plain c/c++ and it doesn’t look the same) and where to learn it from(some book or website).
Hoping for a quick reply
hi,,
i am using code composer studio v4.
after build the project it showing that exceeds code size limit.
so
can anyone tel me that how to see code size of the project.
No. Its only for the for Texas instruments uC
it is stubble for pic mcu ?