Introducing the AmiPIC18 LCD shield
|
|
Last month I reviewed the Amicus18 development board, which is an Arduino-style platform with a PIC microcontroller. The Amicus18 board is physically compatible with Arduino shields. However, the default PIC processor on the board is a 3.3 V type, which could be an issue while interfacing some of the shields that strictly operate at +5V. As a support to the users of the Amicus18 development board, Gevo Electronics from The Netherlands has designed a special shield, named AmiPIC18 LCD. Although the name says it is a LCD shield, but in real it provides a lot more features, which we will be exploring in this article.

AmiPIC18 LCD shield from Gevo Electronics
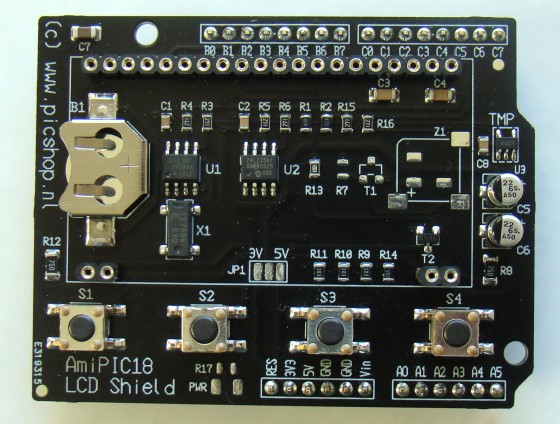
The picture below shows the AmiPIC18 LCD shield. Besides an LCD display, the shield also provides four tact switches, a temperature sensor (TC74), a serial EEPROM (24LC256), and a real-time clock IC (DS1307Z) with a backup battery (CR1220) holder, which make it a perfect choice for experimenting with the Amicus18 board. With all these features available on the board, you can easily turn this shield into a temperature data logger project.

AmiPIC18 LCD shield PCB
The shield has got total 24 female header pins to receive an LCD display. You might be wondering why it has so many pins for LCD connection. This is because the LCD display used in this shield is one from Electronic Assembly’s DOG series LCD modules, which uses ST7036 controller/driver chip. This is one of the best features that I liked about this shield. The instruction set of ST7036 is compatible with HD44780. Besides it also offers a lot more additional functions that HD44780 based LCDs don’t have. For example, it can be configured to drive a dot-matrix LCD through a serial (SPI) interface with a microcontroller. Also, the ST7036 driver provides LCD commands for adjusting the display contrast. Isn’t that a cool feature? Refer the datasheet for further detail on ST7036 display driver.

AmiPIC18 LCD shield with a 16x2 character LCD
Connections on the board
The picture below shows the AmiPIC18 LCD shield stacked on top of an Amicus18 board. The LCD pins on the shield are hardwired to operate in a 4-bit mode. The data pins (D4-D7) are connected to RB4-RB7 port pins, whereas the control signals, RS (register select) and E (enable), are driven by RB2 and RB3 pins of the PIC18F25k20 microcontroller, respectively. The TC74, 24LC256, and DS1307Z devices on the shield are all I2C-compatible and are connected to the I2C port pins RC3 (SCL) and RC4 (SDA). The four tact switches go to PORTA pins (RA0-RA3). The RB1 pin is used to control the LCD backlight. A logic high at RB1 turns the backlight on, and logic low turns it off. The intensity of the backlight can be varied by generating a PWM (pulse-width modulation) signal at the RB1 port pin.

LCD shield plugged into the Amicus18 development board
If you are using a 5.0 V device (PIC18F25K22) on your Amicus18 board, you can still use this LCD shield as it also provides an on-board jumper (JP1) for selecting power supply between 3.3 V and 5.0 V.
Software
Here I have written a little demonstration routine in Proton BASIC to test the LCD contrast set commands of the ST7036 display driver. The program reads the ambient temperature from the TC74 sensor and displays it on the LCD. The two tact switches connected to RA0 and RA1 pins will allow you to increase or decrease the contrast of the LCD display.
' Program for testing LCD contrast adjustment through firmware
' using AmiPIC18 LCD Shield

    Contrast     var Byte
    ContrastSet  var Byte

    Symbol Backlight = PORTB.1  ' Backlight ON/OFF switch
    Symbol Sw_1      = PORTA.0  ' DOWN contrast
    Symbol Sw_2      = PORTA.1  ' UP Contrast
    Symbol SDA = PORTC.4        ' I2C Data line
    Symbol SCL = PORTC.3        ' I2C Clk line
    Symbol TC74_Address = %10011000 ' Address for TC74A4
    Dim Temperature As Byte

    LCD_DTPin = PORTB.4         ' LCD's Data lines (D4 to D7)
    LCD_ENPin = PORTB.3         ' LCD's EN line
    LCD_RSPin = PORTB.2         ' LCD's RS line
    LCD_Interface = 4           ' 4-bit interface to LCD
    LCD_Lines = 2               ' LCD contains 2 lines
    LCD_Type = Alphanumeric     ' LCD type is alphanumeric
    DelayMS 500

    ' ST7036 controller has slightly different initialization
    Print $FE, $29              ' 4-bit mode,
    Print $FE, $14              ' Bias set
    Print $FE, $55              ' Power/ICON/Control
    Print $FE, $6D              ' Follower Control
    Print $FE, $78              ' Contrast set : C3,C2,C1,C0 bits of contrast

    Contrast = 5
    ContrastSet = $70 + Contrast
    Print $FE, ContrastSet
    High Backlight
    Cls                         ' Clear the LCD's screen
    Print At 1, 1, "Ami18 LCD Shield"

    Start:
        I2cIn SDA, SCL, TC74_Address, [Temperature]
        Print At 2, 1, "T = ", Dec Temperature," ", %11011111, "C"

        If Sw_1 = 0 Then
         If Contrast > 0 Then Contrast = Contrast - 1;
         ContrastSet = $70 + Contrast
         Print $FE, ContrastSet
        EndIf

        If Sw_2 = 0 Then
         If Contrast < 10 Then Contrast = Contrast + 1;
         ContrastSet = $70 + Contrast
         Print $FE, ContrastSet
        EndIf
        DelayMS 300
    GoTo Start
Compile the above program and load it into the Amicus18 MCU using the Amicus18 IDE. On reset, you will see the temperature reading displayed on the screen as shown below. Press S1 to decrease and S2 to enhance the display contrast. The quality of display is really great.

Temperature reading from TC74 sensor (full contrast)

LCD contrast adjustment through firmware
Summary
AmiPIC18 LCD shield is based on a ST7036 display controller IC, which is instruction-compatible with HD44780, and has got some additional nice features such as SPI interface, LCD contrast adjustment through firmware, etc. Four tact switches, a temperature sensor, an external EEPROM, and a RTC chip on board are bonus features that make the shield much more versatile. [Gerben] from Gevo Electronics has lately informed me that a new version of LCD shield is on its way with additional features on it. I am excited to see, what else they can put on this little board. I will be posting more projects with AmiPIC18 LCD shield, so stay in touch.
- Where to buy the AmiPIC18 LCD shield: PICshop.nl
- Download schematic of AmiPIC18 LCD shield
- Datasheet of ST7036 LCD controller : ST7036
- Info on Electronic Assembly’s DOG series LCD modules
|
|
Hello,
We change our website PICshop to http://www.eProto.nl (Electronic Prototype).
There you find the AmiPIC18 board and AmiPIC18 LCD Shield.
Thank you and best regards,
Gerben (Gevo Electronics)
Pingback: Electronics-Lab.com Blog » Blog Archive » Introducing the AmiPIC18 LCD shield
Pingback: The AmiPIC18 LCD shield | Leds&Chips
Pingback: Electronics-Lab.com Blog » Blog Archive » Introducing the AmiPIC18 LCD shield