Arduino measures heart beat rate from fingertip
|
|
The PIC16F628A based heart rate meter is one of the most popular projects published on Embedded Lab. In this article, I am going to show how to replicate the same project using a simpler platform like Arduino. The Arduino heart rate meter will use Arduino Uno, Easy Pulse Plugin, and 4-digit SPI seven segment LED display module. It computes the heart beat rate by processing the analog pulse signal output from the Easy Pulse Plugin sensor and displays it on the seven segment display module. The heart beat rate is refreshed every ~3 sec.
Heart beat rate meter using Arduino and Easy Pulse Plugin
What will you need?
The following things are required to build this project.
1. Arduino Uno or any other compatible board. I am using Crowduino Uno SD board for this project.
2. Easy Pulse Plugin : A pulse sensor based on Photoplethysmography principle. It directly plugs on to the left-side headers of Arduino Uno.
3. 4-digit serial seven segment display: It is a MAX7219 based serial segment LED display that is easy to interface with Arduino using only 3 I/O pins.
4. Few male-to-female jumper cables.
Connecting things
The hardware setup of this project is pretty simple and straightforward. Here are the instructions to be followed for setting up the connections between Arduino, Easy Pulse Plugin, and the display.
- On Easy Pulse Plugin module, place the 2-pin shunt jumpers JP1 and JP2 to 5V and A0 positions, respectively. This configuration will allow the module to use the 5V power supply from the Arduino Uno board and connect the pulse output signal to the Arduino’s A0 ADC channel, when it is plugged in to the Arduino Uno board.
- Insert the fingertip pulse sensor jack to the 3.5mm stereo socket on the Easy Pulse Plugin board. Make sure it is inserted well as shown in the picture below. Then plugin the sensor module on to the left headers of the Arduino Uno board such that the A0 and A1 pins of the sensor module go into the A0 and A1 analog pins of the Arduino.
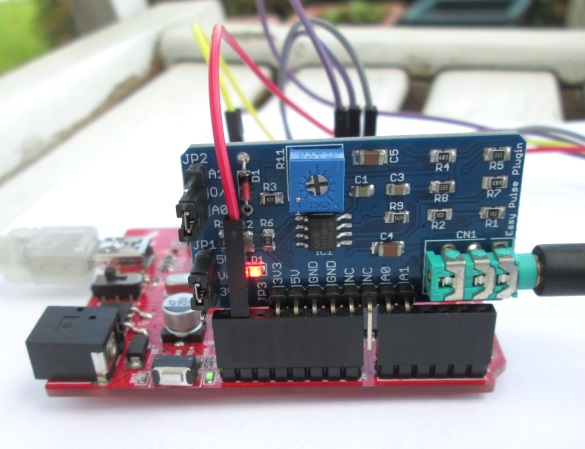
Easy Pulse Plugin module inserted into Arduino headers
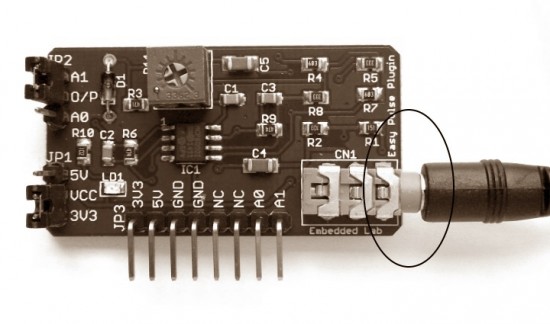
The sensor jack is 3.5mm stereo audio type and should be inserted well into the jack
- Connect the 4-digit seven segment LED display to Arduino Uno as follows:
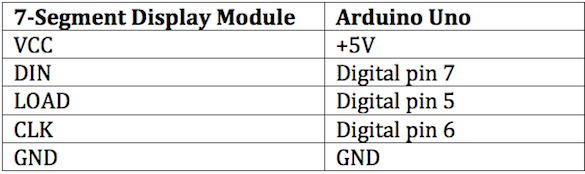
Connections between Arduino Uno and 7-segment display module
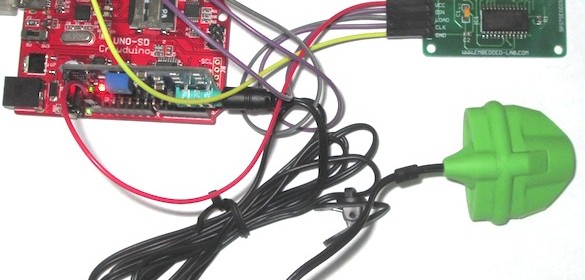
- The following picture shows the complete setup of this project.
-
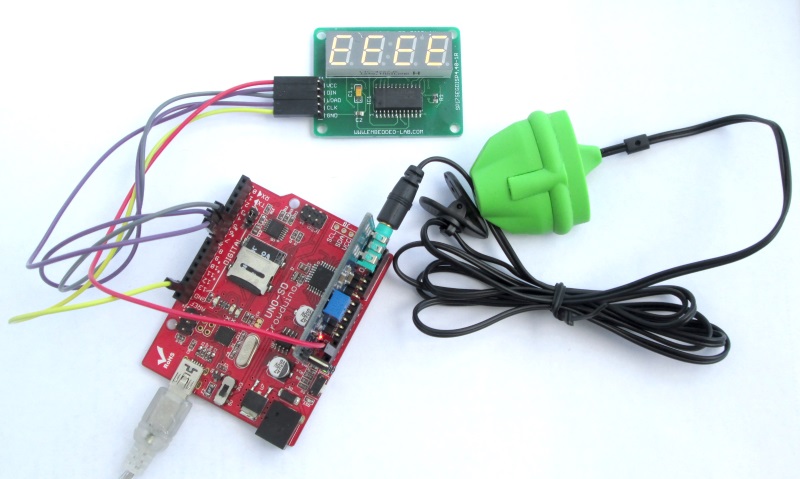
Complete setup of this project
- Load the project sketch to the Arduino board using Arduino IDE. You can download the Arduino sketch for this project from the link below.
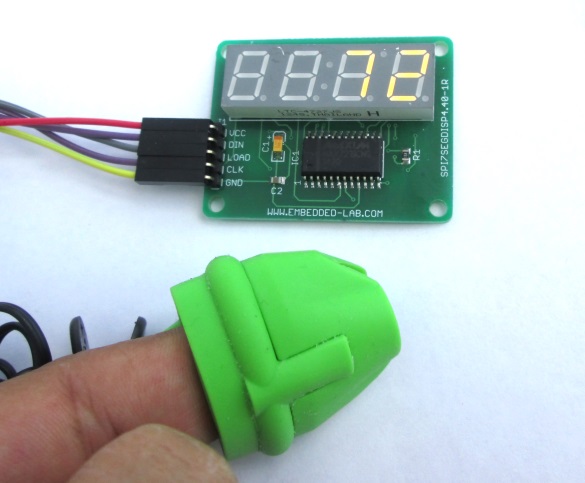
- Wear the sensor on your index fingertip as shown in the picture below. Sit on a chair with your hand resting on some support. The heart rate meter will display the heart beat rate in beats per minute (bpm) on the seven segment LED module. If Arduino didn’t receive any pulse signal from the sensor, it will display ‘EEEE’ on the seven segment as an error message. Otherwise, the heart beat rate is refreshed every 3 seconds.
Troubleshooting
If you keep seeing ‘EEEE’ on display, that means that the Arduino is not receiving a good pulse signal from the sensor. You can try a couple different things like make sure the sensor jack is plugged in well and increase the gain of the instrumentation amplifier on Easy Pulse Plugin board by turning the potentiometer counter-clockwise.
Arduino Software
The pulse signal processing software loaded into Arduino works the same way as described in our chipKIT based pulse meter project which follows the following steps in computing the heart beat rate. Three consecutive peaks are identified in the photoplethysmography output signal using the principle of differentiation (finding maxima where the curve changes the slope from positive to negative), and the spacing (time interval) between the peaks can give the frequency of heart beat.

Algorithm for computing pulse rate
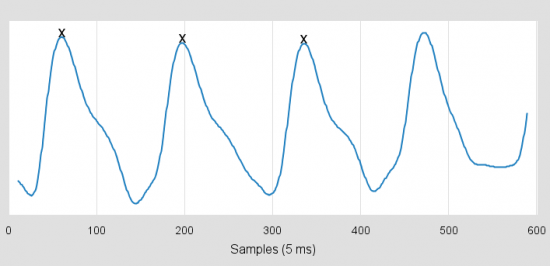
Arduino computes heart beat rate by detecting three consecutive peaks in the pulse signal
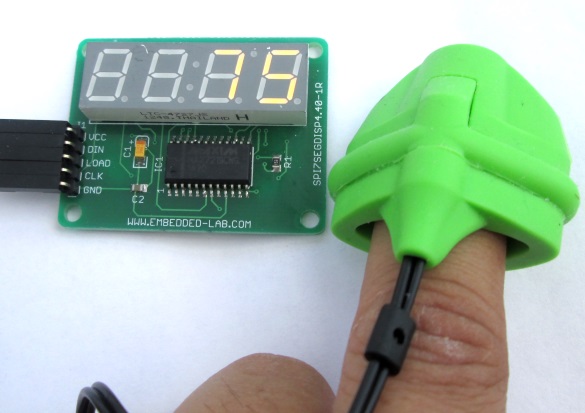
Pulse rate is refreshed in every 3 seconds
|
|
What is the difference between using microcontroller and arduino in heart beat monitoring
hello may i have the code for the seven segment display? thank you!! send me @ doggykhy@hotmail.com
Sir , i need your software’s source code for this project. It will so kind of you if you assist me.
Hi sir, May you please send med the project with details and source code. i need your help, because i have a easy pulse module like this, but i can’t use for final project because i don’t know the code. May you help me. Thank you.
my e-mail is : fitrianarachmawati0611@gmail.com
sir, can you get me the the code for the arduino of measurement of heart beat rate to bunty44434@gamil.com
i need some kind of help about this project.
my email fatimakhatoon029@gmail.com
Hello, Can you please send med the project with details and source code. ty
my e-mail is : vieytezmode@hotmail.com
hello sir,anyone can send the arduino code for working of heart beat sensor and temperature sensor . code ar to my mail I’d code ar to my mail I’dduino sousarra045@gmail.com
Hello, Can you please send med the project with details and source code. ty
my e-mail is : diana20120101@gmail.com
hello sir,can i get the arduino code for working of heart beat sensor and temperature sensor .
to the mail id below
pushpav280596@gmail.com
please sir, required urgently.
i have a temperature code.but i dont have heart beat code..shall u want??
Hello sir,can i get the code for heart beat sensor working .
Hi sir, i need your help with the components of this heart rate meter for my final project. can u pls email me at princessfana97@gmail.com for the list of full components (im not using arduino i need to use pic for my project) really need your help 🙁
sir kindly send me arduino code of this project at mujahidhussainedu@gmail.com
Hello. When I tried to verify the sketch I get the following error message. Is there anyway to fix it? Email is noxdecios@gmail.com. Thank You!
Arduino: 1.6.8 (Windows 10), Board: “Arduino/Genuino Uno”
(file location).ino:10:24: fatal error: LedControl.h: No such file or directory
#include “LedControl.h”
^
compilation terminated.
exit status 1
Error compiling for board Arduino/Genuino Uno.
This report would have more information with
“Show verbose output during compilation”
option enabled in File -> Preferences.
LOAD LIBRARY AVAILABLE IN THE INCLUDE LIBRARY SECTION AS LEDCONTROL.H
how can we obtain these components online?
Hello, I’ve managed to implement basically the entire project. I have a question about when I’m operating the system, which is the number displayed is always something unique and then it swaps to ‘EEEE’. I re-adjust my finger and the same thing happens which is showing a number, then the EEEE. What can I do to improve my results consistency and even removing the EEEE for the most part. I’ve done the troubleshooting tips but they don’t seem to help.
Thanks
Make sure the 3.5mm stereo connector is inserted well into the socket. And set the potentiometer to middle position.
anyone can send this code to my mail I’d Sunil.m.mn143@gmail.com
please sir i need the code for this arduino heart rate beat.i dint see it above thank you
Pingback: BLOG | Stand-alone digital pulse meter using Easy Pulse Plugin and Crowtail modules
Sir can you please mail me the arduino code of this project, the project is interesting and simple so.
My mail ID is lavithramysore@gmail.com
Pingback: Arduino measures heart beat rate from fingertip -Use Arduino for Projects
can i get the source code of this project.please mail it to priyankanaik018@gmail.com
Hi, is the device for sale?
Please is it possible to get the source code from you or i’ll work on that on my own? Please let me know. Ayoibiyeye@yahoo.com thanks
The download link for Arduino code is in the same page. Read the article carefully.
hi can i get source code and material list? interesting project.
brogebre@gmail.com
hi pls… can i get the source code and material list? it is very interesting brogebre@gmail.com
Pingback: Arduino measures heart beat rate from fingertip | Tehnik Service
hi raj! Is it accurate?
thank you!
marC:)
Did you mean the accuracy of pulse rate? It should be fairly accurate.