Author Archives: R-B

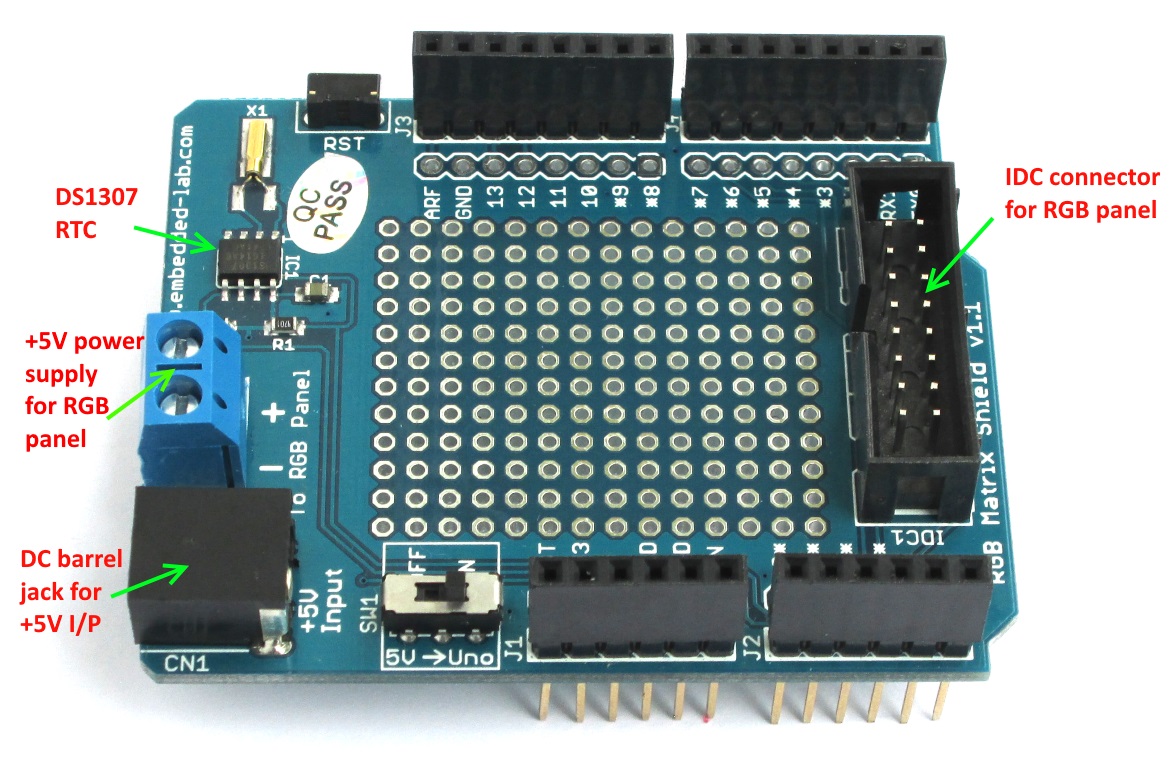
16×32 RGB Matrix Panel Driver Shield Revision 1

Our RGB matrix panel driver shield for Arduino Uno has been slightly revised. The shield now also carries the DS1307 RTC chip on board along with a CR1220 coin cell battery holder on the back. It is applicable for driving popular 16×32 RGB matrix panels with HUB75 (8×2 IDC) connectors. Row and column driver circuits are already built on the back side of these matrix panel. The data and control signal pins for driving rows and columns are accessible through the HUB75 connector. It requires 12 digital I/O pins of Arduino Uno for full color control.

Revised RGB Matrix driver shield

Revised RGB Matrix driver shield

The revised version also has a slide switch (SW1) to select the source of the 5V input to the Arduino Uno. If it is in ON position, the 5V input from the DC barrel jack of the shield also goes to the VIN pin of Arduino Uno. In this case, Arduino Uno does not need to be powered separately as it gets from the shield. If the switch is in OFF position, the Arduino Uno must need its own power supply, which could be from an USB port or an extra DC wall adapter connected to the Uno board.

rgbshield2

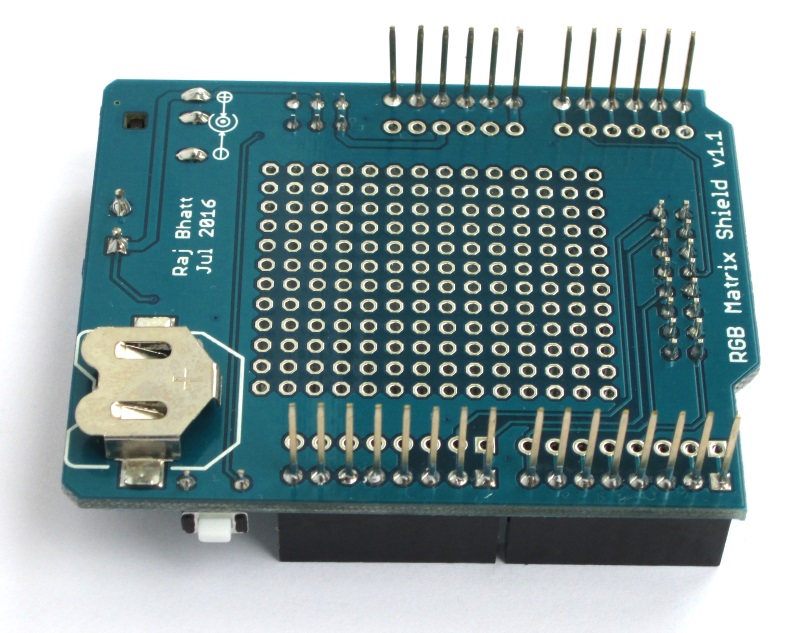
CR1220 coin cell battery holder for RTC chip

We sell the display module, the RGB driver shield, and connecting wires as a kit at our Tindie Store. Outside the United States, you can also purchase it from our Elecrow Store. The DS1307 RTC chip’s I2C bus is pre-wired to the Arduino A4 and A5 pins on the shield. This display module is fully compatible with Adafruit’s RGBMatrixPanel Library.

rgbpackage

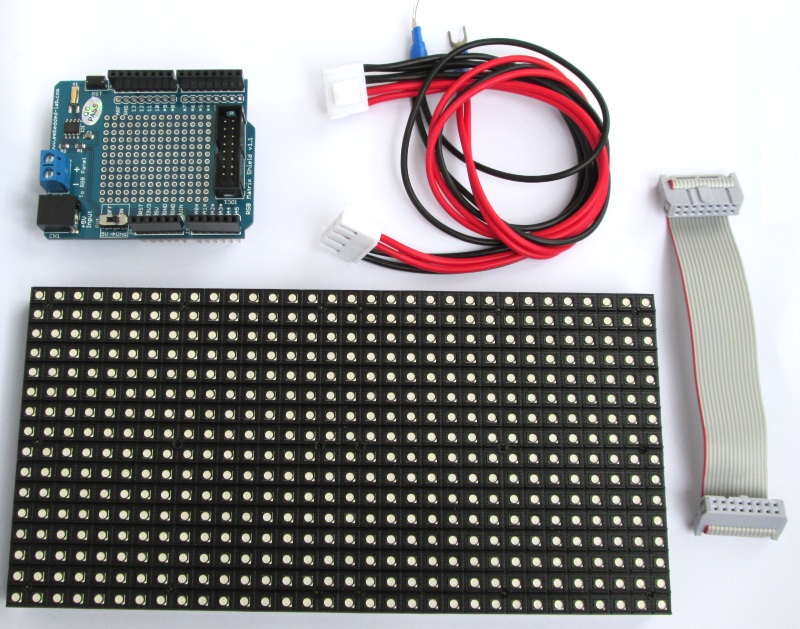
RGB panel and driver shield kit for only $32.99 at our Tindie store
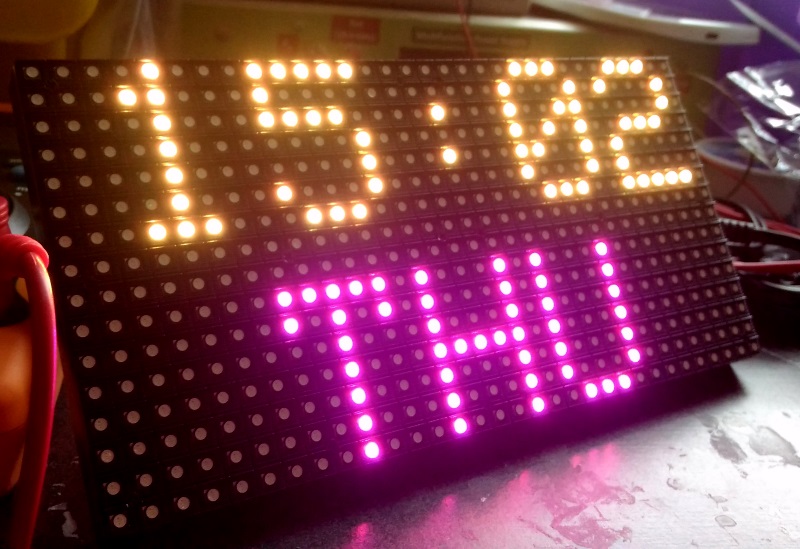
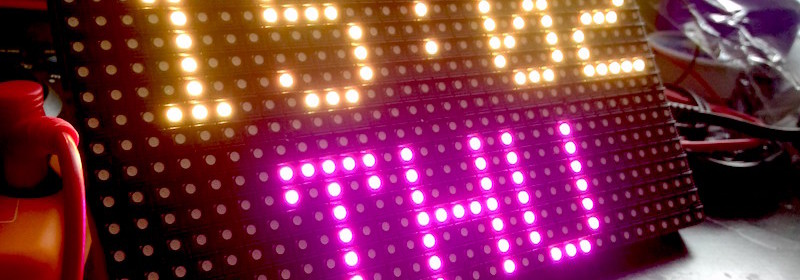
RTC demo

RTC demo

Links:
Buy it here in Unites States
Buy from our Elecrow Store in China
Hookup guide and demo program for this kit

Note that the power supply required to power the LED panel is not included in the kit. You will need a regulated 5V DC power supply with enough current sourcing capability (~2A) to power the RGB panel. More details on the external power supply can be found in the hookup guide (link provided above).

Another weather station using modular design approach

Nevyn’s entry to the 2016 Hackaday Prize contest is a modular weather station built using a number of sensors mounted on a general purpose circuit board. The sensor readings are captured by ESP8266 and sent out to the internet.

Modular weather station

Modular weather station

The initial project supports the following measurements:
– Air temperature
– Air pressure
– Humidity
– Ground temperature
– Light intensity (luminosity)
– Ultraviolet light intensity
– Wind speed
– Wind direction
– Rain fall

The weather station will be designed to work off-grid with limited capacity to store data for upload at a later date should an Internet connection fail temporarily.


Chronio: Another Arduino based wrist watch

Chronio is an Arduino-based 3D-printed wrist watch designed by Max.K. The watch fits in a 22mm watch strap and runs on a 160mAh button cell for several months. A 96×96 pixel Sharp Memory LCD is used for display. Besides telling time, you can play a simplified version of Flappy Bird on it.

Arduino wrist watch

Arduino wrist watch

Features
  • The ATmega is in Sleep mode for most of the time and only runs once a minute to update the time or if a button is pressed. This reduces the current consumption to 2uA. Sady the display needs a certain pulse every second, which requires a complicated additional circuit. Because of this the current consumption is around 20uA. This still makes for around half a year of battery life.
  • User Interface controllable with three side buttons. Buttons are 3D-printed and activate switches on the PCB
  • Tells time, date, temperature and battery voltage on the main screen. No additional temperature sensor is needed, because the DS3231 already has one integrated for temperature compensation.
  • Stopwatch
  • Flappy Bird clone (“That would have been cool in 2013”)
  • The case consists of four 3D-printed parts. It has a thickness of only 10.8mm, which is thinner than the Apple Watch. Unfortunately it lacks screen protection.
  • Fits any 22mm Watchband

Chronio demo video:

Vibrating Mesh Nebulizer using PIC MCU

A nebulizer is a medical device that is used to transform a liquid medicine into aerosol droplets so that patients with pulmonary diseases can easily inhale the medication into lungs. Medical nebulizers are commonly used for the treatment of COPD, asthma, cystic fibrosis and other respiratory diseases. This application note from Microchip demonstrates an implementation of driving a piezo mesh disk in a vibrating mesh nebulizer demo. The demo system features a Microchip 8-bitPIC16F1713 microcontroller-based piezo mesh disk driver board and a nebulizer plastic housing.

block

Block diagram of the nebulizer reference design

setup

Vibrating mesh nebulizer using PIC mcu

A significant innovation made in the nebulizer market is vibrating mesh technology. Basically, a vibrating mesh nebulizer is composed of a liquid reservoir with a piezo mesh disk mounted on one side of it, and a piezo mesh driver circuit board with batteries. The piezo mesh disk consists of a stainless steel plate that has been perforated with thousands of precision-formed, laser-drilled holes, and surrounded by a piezoelectric material.
The piezoelectric material will vibrate at a very high rate of speed when it is driven by an analog signal of specific voltage, frequency, and waveform that is generated by the driver board. As a result of rapid vibration, solution is drawn through the holes to form droplets of consistent size that are delivered at a low velocity to be be inhaled directly into the lungs.

Arduino ultrasonic radar

Dejan Nedelkovski from How To Mechatronics has a very nice tutorial about making an ultrasonic radar using Arduino and Processing platforms. The project requires an HC-SR04 ranging sensor module mounted on a servo motor to scan the surrounding. The Arduino board control the scan position, as well as receives the ranging sensor output. The received echo data is post-processed on a computer using a Processing-based application and the radar signature is displayed on the computer screen.

Arduino ultrasonic radar

Arduino ultrasonic radar

See this radar in action in the following video.

« Older Entries Recent Entries »