Lab 19: Play musical notes
|
|
We have discussed in the past experiments how to use a PIC microcontroller to do a variety of things from flashing an LED to driving a motor, etc. Today, we will see how to play notes of a song with a PIC microcontroller. Musical notes are simply sound waves of particular frequencies. If the frequency of a note is known correctly, a microcontroller can be programmed to play the note by generating a square wave (of the same frequency) signal at one of its I/O pins. The signal must be fed to a speaker to listen to the sound. Here, we will discuss playing notes of the popular “Happy birthday to you” tune using a PIC16F628A microcontroller and a buzzer.

Musical notes using a PIC micro
Theory
In order to play the tune of a song, you need to know its musical notes. Each note is played for a certain duration and there is a certain time gap between two successive notes. The table below provides frequencies of musical notes starting from middle C. The middle C is designated as C4 because it is the fourth C key on a standard 88-key piano keyboard.

Musical notes and their frequencies starting from Middle C
The notes of the other octaves can be obtained by multiplying or dividing these frequencies by 2. For example, the next C note above the middle C would have a frequency of 524 Hz. You can find the frequencies of rest of the notes at the following link: http://cs.nyu.edu/courses/fall03/V22.0201-003/notes.htm
Musical notes can be generated using square waves of the note frequencies. So, in order to play the tune of a song with a microcontroller, all you need to know are the musical notes and their timing information; rest is all programming. A square wave can be generated at an I/O pin of PIC microcontroller by bit-banging the pin high and low. An alternative way of achieving this is using a hardware PWM module. Here, we will be using the former one.
Circuit diagram
The circuit diagram for this experiment is pretty simple. The RB0 pin of the PIC16F628A microcontroller is bit-banged to generate a square wave tone of desired frequency. An I/O pin of PIC16F628A can source current up to 25 mA, which may not be sufficient to drive an electric buzzer directly. Therefore, a BC547 NPN transistor is used as a current amplifier for the buzzer. An RC filtering may be used to improve the quality of audio (square waves are not pure waves and so they don’t sound as good as sine waves), but for simplicity, it is not implemented here.

Electrical coil buzzer is driven through RB0 pin using a transistor

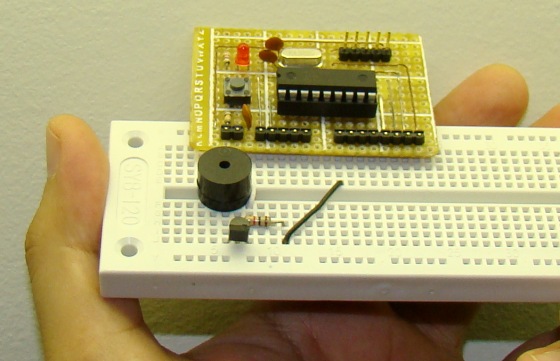
Circuit setup on breadboard
You can see I am using my PIC16F628A breadboard module in this experiment.
Software
Generating audio tones is very easy in mikroC Pro for PIC compiler. It has a built-in Sound Library for serving this purpose. The library has following two functions:
Sound_Init(char *snd_port, char snd_pin): Configures the appropriate MCU pin for sound generation. For example, Sound_Init(&PORTB,0) will configure RB0 pin for the sound output.
Sound_Play(unsigned freq_in_hz, unsigned duration_ms): Generates a square wave signal on the appropriate pin.
The note frequencies of a song can be either defined as a variable array or saved as a constant array in ROM (if RAM size is not sufficient) of the microcontroller. The notes of the song “Happy birthday to you” are not too big and therefore, can be defined in an integer-type array in mikroC, as:
/* Hap py Birth Day to you, Hap py birth day to C4 C4 D4 C4 F4 E4 C4 C4 D4 C4 G4 */ unsigned int notes[] = { 262, 262, 294, 262, 349, 330, 262, 262, 294, 262, 392, /* you, Hap py Birth Day dear xxxx Hap py birth F4 C4 C4 C5 A4 F4 E4 D4 B4b B4b A4 */ 349, 262, 262, 523, 440, 349, 330, 294, 466, 466, 440, /* day to you F4 G4 F4 */ 349, 392, 349 }; |
Similarly, the duration of each note frequency can also be defined in another integer-type array of the same size. The complete program (source + HEX files) can be downloaded from the following link.
Download mikroC source and HEX files
Here’s a video showing the “Happy birthday to you” tune being played by the PIC16F628A microcontroller. You can tweak the time durations of notes little bit to sound it better.
Although bit-banging an I/O pin seems to be a very easy way of generating sound, the microcontroller might be substantially occupied while the tone is active. Read this article to find out alternative ways of producing sound with a microcontroller.
|
|
Salve, è interessante il suo articolo, si potrebbe convertire il file sorgente in assembly ?
hi
may i know how to set frequencies to generate sound for welcom to home
Please what are the component used for this experiment… i need them in details.thanks
how i coneects this ckt in ISIS for simulating….beacuse in proteus PIC16F628A have not pins no 5 & 14
I have tested this on hardware and its now working but noisy and distorted sound quality.. You mentioned about adding RC filters .. How can i use them to filter out those noise? ..
I am trying this experiment on real hardware… and i used 16F84.. its not working.. All it plays is the C note.. i edit the code so that it plays from Do Re Mi Fa Sol la Ti Do..
Pingback: T?o ??n âm b?ng PIC
hi,
May I know how to produce sine wave? As I have researched, to use a RC filtering, the frequency input to RC filtering must be a fixed frequency because the value of RC depends on the frequency. But in this case different frequencies are used, so different RC values are needed. Correct me if im wrong. Help needed. Thanks in advance =)
Sir I’d like to get more tone combinations for different tunes.
Plz give me a site asap where I can find those!!!
Thanks in advance………
I dont see your main code in that link 🙁
The folder contains all the project files.
Try putting this in your code:
do {
for(k = 0; k<25; k++){
Sound_Play(notes[k], 100*interval[k]);
portc.rc1 = 1; // pause the sound
pause(6);
}
pause(100);
}while(1);
}
Hi Raj,
You have a very interesting page! Congratulations! I am trying to re-write (and modify) your projects/tutorials with Hi-Tech C which doesn’t have the libraries which you quote. But for this project I have a hardware problem – you use electromagnetic buzzer not a piezzo, right? As far as I know a buzzer without a built-in driver behaves like a coil. So you need to take a precaution like with a relay – a flywheel diode. I assume yours is with a driver due to the connection you selected. Am I right? Mine has a driver but I still need to use your connection because it needs 30mA. It is hard to find an answer in Internet what is the internal connection of this driver. So I need to ask :). Thanks for your answer.
is it really working author??
Pingback: Assembly Programming (Play musical notes) Tutorial + Sample Codes | xiruki
Hey Raj, is the mclr pin and reset switch wiring correct in that schematic?
Absolutely not! I just corrected it.
Thanks Michael!
Is there any difference in the sound quality of a square wave to a sine wave?
What would this sound like with a low pass to smooth the edges make it sound more natural?
hi sir ,
Play musical notes is very – very nice project .im waiting for it yet time , now my waiting time is over .
many – many thanks .
but one confutation , how can Play human vice notes for indication of any other for error condition ?
it my possible ?
Playing human voice is quite different from playing musical notes. You need to sample the human voice first through A/D conversion and then store it in an EEPROM or SD card. Then, you can play it back by reading the digital samples and converting them into analog voltage using a DAC.
can you please tell me that to generate sound we need analog at output then how we can generate analog? as PIC628A don have inbuilt adc.
Pingback: Electronics-Lab.com Blog » Blog Archive » Playing musical notes with a PIC microcontroller