Author Archives: R-B

Temperature and relative humidity display with adaptive brightness control

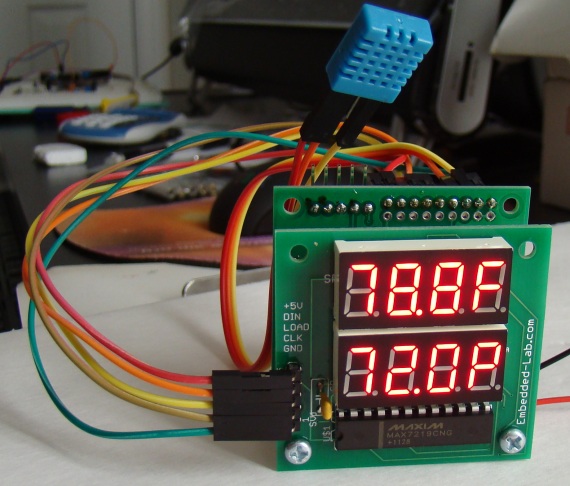
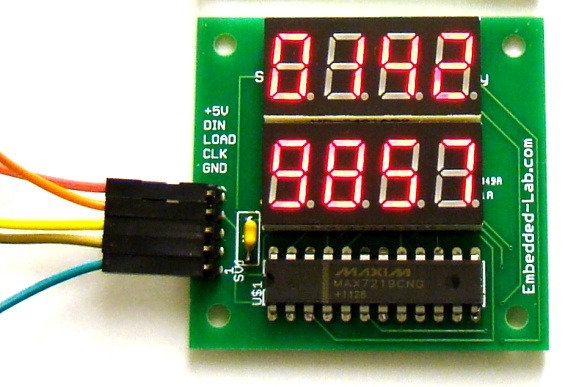
The objective of this project is to illustrate a technique of implementing adaptive brightness control to seven segment LED displays. It consists of a closed loop system that continuously assesses ambient light condition using an inexpensive light-dependent resistor (LDR) and uses that information to adjust the brightness of the display. For the proof of concept, the technique is applied to construct a digital temperature and relative humidity meter that adapts the brightness of the seven segment LED displays to the surrounding lighting conditions. There are 8 seven segment LED displays used in this project and they are all driven by one MAX7219 chip. The ambient temperature and relative humidity are measured using the DHT11 sensor. The microcontroller used in this project is PIC12F683, which is a low-pin-count (8) device from 8-bit PIC microcontroller family. Auto-adjusting the brightness of the seven-segment LED display with surrounding illumination enhances the readability in all ambient lighting conditions.

Temperature and humidity display with auto-brightness control

Read more

Dual 4-digit seven segment LED display with SPI interface

This project is an extension of my previous MAX7219 based SPI seven segment LED display module. The new display features eight 7-segment displays arranged in two rows of four digits. The on-board MAX7219 driver enables you to easily add eight 7-segment LED displays to your project using only 3 I/O pins of microcontroller. The major advantage of using this board is the time-division multiplexing operations required for continuous refreshing of the display digits are performed by the MAX7219 chip, thereby keeping the microcontroller free for doing other pressing tasks. It is suitable for displaying two variable values simultaneously in a project, such as displaying temperature and humidity, or current and voltage, etc.

8-digit seven segment LED display with serial interface

Read more

PIC12F microcontroller project board

The 12F series of PIC microcontrollers are handy little 8-pin devices designed for small embedded applications that do not require too many I/O resources, and where small size is advantageous. These applications include a wide range of everyday products such as hair dryers, electric toothbrushes, rice cookers, vacuum cleaners, coffee makers, and blenders. Despite their small size, the PIC12F series microcontrollers offer interesting features including wide operating voltage, internal programmable oscillator, 4 channels of 10-bit ADC, on-board EEPROM memory, on-chip voltage reference, multiple communication peripherals (UART, SPI, and I2C), PWM, and more. The following project board is designed for fast and easy development of standalone applications using PIC12F microcontrollers. It features on-board regulated +5V power supply, header connectors to access I/O pins, ICSP header for programming, a reset circuit, and small prototyping area for placing additional components.

PIC12F development board driving a serial seven segment LED display

Read more

chipKIT Project 1: Digital thermometer using an LM34 sensor

In Tutorial 3, we learnt how to use chiKIT ADC channels to read an external analog voltage and convert it into a digital number. We also discussed about interfacing a standard Hitachi 44780-based character LCD to the chipKIT Uno32 board in Tutorial 4. Now it’s time to implement the knowledge we have gained so far to make our first practical application using chipKIT, which is a digital thermometer. Since temperature is a non-electrical entity, the first thing we need is a transducer or sensor to convert it into an electrical signal. In this project, we will use the LM34 sensor to do that, which converts the surrounding temperature into an analog electrical voltage. The sensor’s analog output is fed to an ADC channel of the chipKIT Uno32, which then process the signal and displays the temperature on LCD, in both degree Celsius and Fahrenheit scales.

Digital thermometer project

Read more

Play the classic Breakout game with hand motions

A group of students at Cornell university designed a new version of the classic Breakout game. The traditional way of playing the game is through key presses that moves the paddle left and right in order to bounce the traveling ball upward, keeping it in play. However, in this new design the player can move his hand left, right, up, or down to control the paddle accordingly. A CCD camera was used to sense the motion of the hand. The image captured by the camera was processed by the Altera® DE2 FPGA Development board to detect the hand position in the image frame. The game is displayed on a VGA monitor.

Breakout game played with motion of a hand

Watch this project in action.

« Older Entries Recent Entries »