Integrating STM32F4xx Standard Peripheral Library with MikroC Pro for ARM
|
|
STM32F4xx series micros are far more advanced than anything else similar in the market. Apart from being fast 32-bit MCUs, STM32F4s have rich hardware peripheral support with DSP engine bonus. In terms of capabilities versus price tag, STM32F4s are all-square-winners. In recent times there’s a surge in the STM32 user community. STM32 Discovery boards are proliferating like never before. In several occasions recently, I received tangible amounts of queries from readers regarding integration of STM32F4xx Standard Peripheral Library (SPL) with MikroC Pro for ARM and so even though it is not one of my mainstream posts on STM32 ARMs, I felt that I should address this topic. Previously I showed how to port STM32F1xx SPL for STM32F1xx series devices with MikroC. This post will not be different from the former one – only minute changes. I suggest readers to read the earlier post first before reading this one. 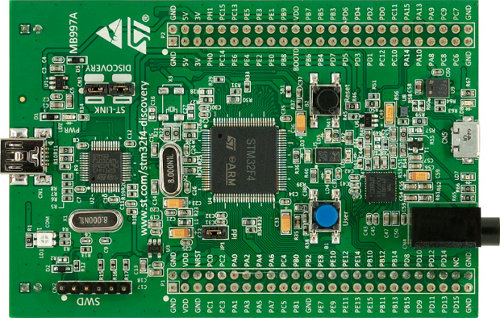
At present MikroC compiler is one of the few compilers that hasn’t yet officially provided any support for SPL integration. Hopefully they will add this support in the future but the way MikroC addresses a solution is different from other compilers. MikroC has a really awesome IDE and a rich library base support while SPL gives its user more control over on a chip’s hardware. Like I said before together these become a doubled-edge sword.
Tools Needed
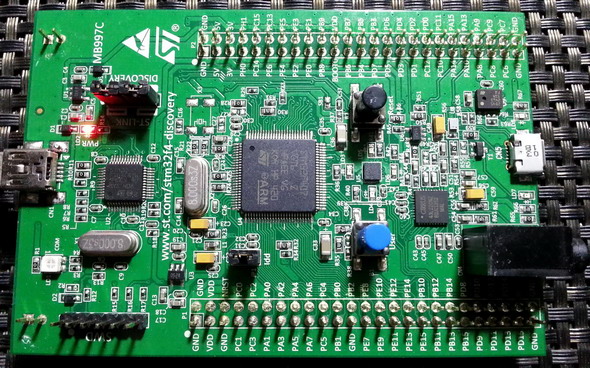
Firstly you’ll need MikroC Pro for ARM. The compiler has a demo version that provides an 8k code limit, enough for first-hand ARM experience. You’ll need a STM32F4xx board. I used a STM32F407VG Discovery. This board from ST Microelectronics is somewhat the flagship Discovery board of the STM32F4 series and it is very popular. Finally you’ll need STM32F4xxx SPL which I included in my example. The files in them are modified to work with MikroC environment.
Things to do
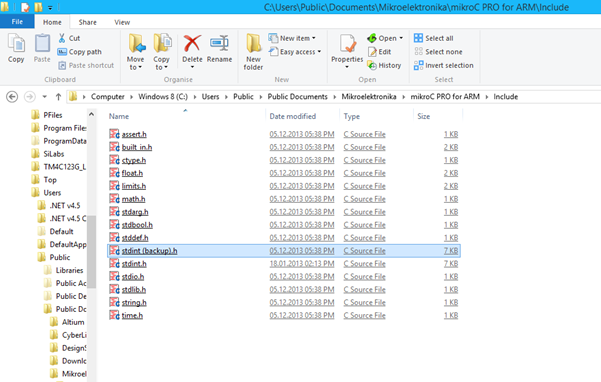
Firstly we need to prepare our MikroC PRO for ARM compiler for linking the SPL. I’m assuming that the compiler is preinstalled. First go to the compiler’s installation folder and locate the include folder. In my case, it is: C:\Users\Public\Documents\Mikroelektronika\mikroC PRO for ARM\Include.
In this folder, there’s a file named stdint.h. Rename it to stdint (backup).h and copy the new stdint.h file from the supplied folder to this location. If you already did so during my previous post or upgraded to MikroC Pro for ARM version 4.15 (the latest release at the time of this writing), then skip this part.
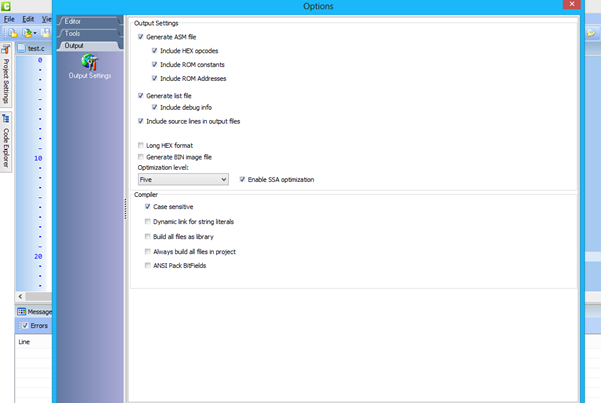
Next we have to change some options of the compiler. Launch the compiler and the follow as shown below:
Tools >> Options >> Output Settings
Check Case sensitive. Apply and close this window. Again skip this part if you already did so earlier.
Be cautious from now on with regards to naming and letter cases because the compiler is now sensitive to this or otherwise you’ll be doomed in the abyss of programming misfortune. Just a simple but useful tip – Compile your code few often after some edits or modifications. This will greatly help you to debug tiny mistakes in a small frame of coding window.
Finally keep the SPL in secured location. Whenever you code a new project with the SPL, copy it from this location and use it with the project. This will make sure that the original SPL copy is not accidentally modified.
Coding with SPL
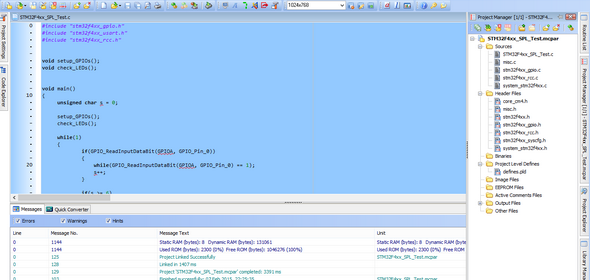
The example code is just another blinking code example as it will suffice. I’m not going to tell you how to create a new project in MikroC. I presume it is known to you. Create a new project and using the Project Manager add all the source and header files from the SPL folder. You can simply add the header and source files of only the required peripherals or you can add all if you are not sure which one stand for which. The former approach takes less compilation time than the latter. Additionally add the defines.pld Project Level Definition file. Now you are ready to code with the SPL. 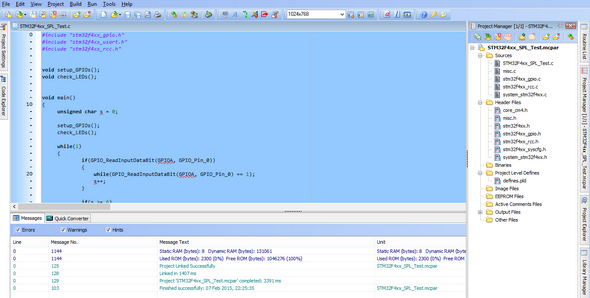
Please be noted that since the SPL is not yet officially integrated by MikroElektronika, you’ll notice red error markers under various parts of a code with SPL. This is not unusual and not an error. So no worries.
Code:
#include "stm32f4xx_gpio.h"
#include "stm32f4xx_usart.h"
#include "stm32f4xx_rcc.h"
void setup_GPIOs();
void check_LEDs();
void main()
{
unsigned char s = 0;
setup_GPIOs();
check_LEDs();
while(1)
{
if(GPIO_ReadInputDataBit(GPIOA, GPIO_Pin_0))
{
while(GPIO_ReadInputDataBit(GPIOA, GPIO_Pin_0) == 1);
s++;
}
if(s >= 6)
{
s = 0;
}
switch(s)
{
case 1:
{
GPIO_SetBits(GPIOD, GPIO_Pin_12);
break;
}
case 2:
{
GPIO_SetBits(GPIOD, GPIO_Pin_13);
break;
}
case 3:
{
GPIO_SetBits(GPIOD, GPIO_Pin_14);
break;
}
case 4:
{
GPIO_SetBits(GPIOD, GPIO_Pin_15);
break;
}
case 5:
{
GPIO_SetBits(GPIOD, GPIO_Pin_12);
GPIO_SetBits(GPIOD, GPIO_Pin_13);
GPIO_SetBits(GPIOD, GPIO_Pin_14);
GPIO_SetBits(GPIOD, GPIO_Pin_15);
break;
}
default:
{
break;
}
}
Delay_ms(90);
GPIO_ResetBits(GPIOD, GPIO_Pin_12);
GPIO_ResetBits(GPIOD, GPIO_Pin_13);
GPIO_ResetBits(GPIOD, GPIO_Pin_14);
GPIO_ResetBits(GPIOD, GPIO_Pin_15);
Delay_ms(90);
}
}
void setup_GPIOs()
{
GPIO_InitTypeDef GPIO_InitStructure;
RCC_AHB1PeriphClockCmd(RCC_AHB1Periph_GPIOA, ENABLE);
RCC_AHB1PeriphClockCmd(RCC_AHB1Periph_GPIOD, ENABLE);
GPIO_InitStructure.GPIO_Pin = GPIO_Pin_0;
GPIO_InitStructure.GPIO_Mode = GPIO_Mode_IN;
GPIO_InitStructure.GPIO_Speed = GPIO_Speed_50MHz;
GPIO_InitStructure.GPIO_OType = GPIO_OType_PP;
GPIO_InitStructure.GPIO_PuPd = GPIO_PuPd_DOWN;
GPIO_Init(GPIOA, &GPIO_InitStructure);
GPIO_InitStructure.GPIO_Pin = (GPIO_Pin_12 | GPIO_Pin_13 | GPIO_Pin_14 | GPIO_Pin_15);
GPIO_InitStructure.GPIO_Mode = GPIO_Mode_OUT;
GPIO_InitStructure.GPIO_Speed = GPIO_Speed_2MHz;
GPIO_InitStructure.GPIO_OType = GPIO_OType_PP;
GPIO_InitStructure.GPIO_PuPd = GPIO_PuPd_NOPULL;
GPIO_Init(GPIOD, &GPIO_InitStructure);
}
void check_LEDs()
{
GPIO_SetBits(GPIOD, (GPIO_Pin_12 | GPIO_Pin_13 | GPIO_Pin_14 | GPIO_Pin_15));
Delay_ms(900);
GPIO_ResetBits(GPIOD, (GPIO_Pin_12 | GPIO_Pin_13 | GPIO_Pin_14 | GPIO_Pin_15));
}

Demo video link: https://www.youtube.com/watch?v=ngk-4Lm11yU.
Personally I haven’t made myself dependent on SPL so far and I believe in raw level coding-learning. SPL allows textbook entry in STM32 arena. No wonder it makes coding easy but the adverse effect of it in my eyes is the fact that its users will spend less time with reference manuals and datasheet. This in turn will affect them in acquiring solid learning of internal hardware peripherals and their working principles. If SPL is to make life easy this way then why not use MikroC libraries. Those are even more easy to use. Sometimes libraries are lifesavers while sometimes they are curse. Sometimes you would not like to reinvent the “wheel” but you would certainly like to make a vehicle with it and that my friend worth more than anything else. At this point I don’t want to debate further in this matter. I leave this choice to users.
Happy coding.
Repository: https://github.com/sshahryiar/STM32-Tutorials
Author: Shawon M. Shahryiar
https://www.youtube.com/c/sshahryiar
|
|
Hi, I’ve downloaded the linked SPL rar file, but there is no stdint.h file included? I presume this needs to be a different version than the one in your first tutorial for the STM32F10x, which does include the file.
Was it supposed to be included, or can I just use the one from the other tutorial?
My bad…. Thanks for the info…. Probably overlooked it when zipping the files…. Well it is the same file as in my STM32F10x series post…. No need to change it every time you move from one STM32 series to another…..
when i start loading the programme in the stm32f4 discovery i received the folowing error “Unknown MCU” .
any idea on how to fix this error ?
Where do you get this error – compiler or programmer software?
I received a STM32F407VG Discovery from Element14 as an award for a design. Although I have some experience with Arduinos and a MediaTek LinkIt One I was shocked at how hard or how steep the learning curve was for programming this board. Thank you for your work in this area. I’m finding it quite helpful.
Hi could u please give some tutorial on timers too based on the stm10xx family cortex m3 t to be precise
Currently I’m making tutorials on Timers and PWM peripherals…. Hopefully I’ll be posting soon….
hi is this library also compatible with the cortex m3 series?
Did you mean STM32F1xx series because that series is based on Cortex M3 core? SPL for different families are not same and so can’t be interchanged….
Pingback: Integrating STM32F4xx Standard Peripheral Library with MikroC Pro for ARM - Arduino collector blog