STM32 Timers

|
|
Input Capture
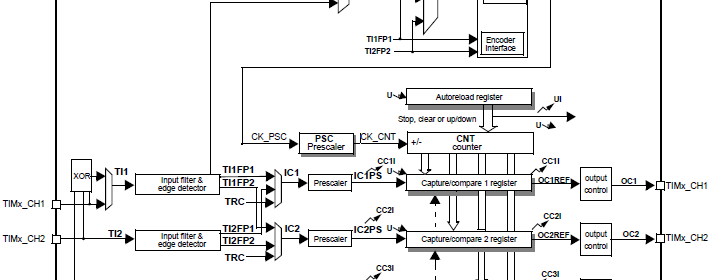
Input capture is an added functionality for a timer module and is also available in most modern micros. Again except the basic timers, all STM32 timers can be used for input capture. With this mode we can measure pulse width/duty cycle, frequency of a waveform and count pulses. The concept behind input capture is same in all micros and in STM32 micros this is indifferent. Incoming waveform is sensed by an input pin. The edge transition (rising/falling edge) of the incoming waveform is detected and the current value of timer counter related to the capture pin is saved in the corresponding capture/compare register, TIMx_CCRx. An interrupt/DMA request is then generated to notify capture process completion.
Input capture is also another example where you do not have MikroC built-in library to help you out. Thus we need to code on our own. Just as with output compare mode, we need to deal with a few register sets.
To begin with, we need to look back into TIMx_CCMRx registers. This time we specifically need the second rows of these registers since these are what we will be needing for input capture mode.


We already know that CCxS bits select mode of operation of timer I/O channels. Thus for input capture these bits can’t be both zeroes. Be sure of the channel you wish to use and be sure of these bit settings. ICxPSC bits set input prescaler. Finally ICxF bits configure input filter sampling length. These together help us to truly determine the actual logic state of an incoming waveform that is spiky or somewhat noisy.
We also need to set which channel we are going to use and which edge to detect. These are done by setting the bits in TIMx_CCER registers. Remember these registers are different for advanced and general purpose timers.
To trigger interrupts/DMA requests we need to set TIMx_DIER register bits. Most timers have one interrupt vector address. There are flags in the Timer Status resgiters, TIMx_SR that are set by hardware to notify which interrupts have occurred. Advance timers have more than one interrupt vector and so be aware of such.

During a capture event TIMx_CCRx registers capture/store the current value of TIMx_CNT register. In this way we get a time-based reference of an input capture event. Comparing two such even will enable us to determine pulse width or frequency of a waveform.
Code Examples
Input Capture Example
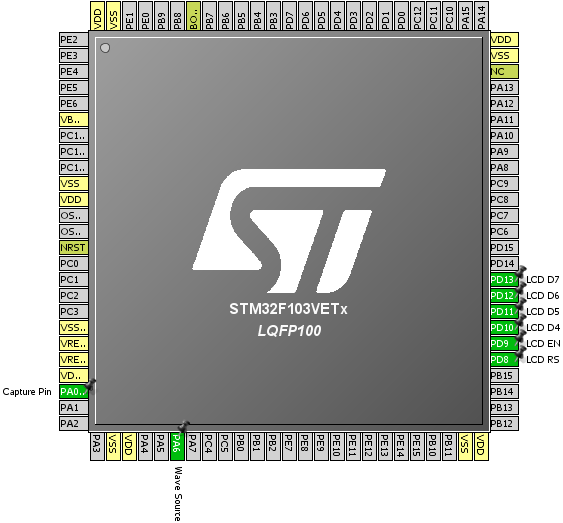
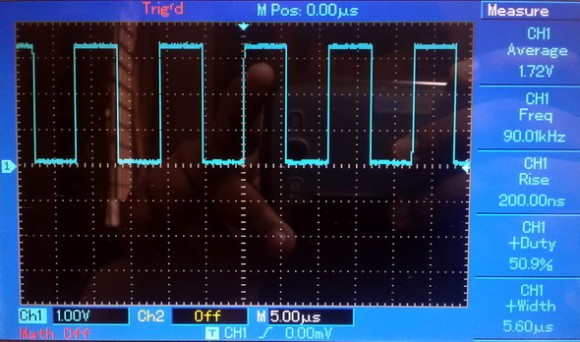
In this example we will employ the input capture feature of STM32 timers to measure the frequency of an incoming waveform. For this task we will need two components of a timer – input capture component to detect waveform and a time base to keep track of time. The example is made out as such that another timer will provide the waveform for capture. Timer 3 is used to generate 90 kHz PWM having roughly equal mark to space ratio. Timer 2 is used to capture this waveform and determine its frequency.
For input capture timer channels need to be specified as inputs, additionally pull resistors may be use. The code for timer 2 setup can be realized as two parts. One part sets it as a time base generator while the other sets up input capture properties. Let us have look at this setup:
TIM2_ARR = 0xFFFF;
TIM2_PSC = 71;
set_TIM2_counting_direction(up_counting);
set_TIM2_clock_division(clock_division_tCK_INT);
set_TIM2_CC1_selection(CC1_input_IC1_on_TI1);
set_TIM2_CC1_state_and_polarity(enable, rising_edge);
set_TIM2_IC1_input_prescalar(0);
set_TIM2_IC1_filter(0);
Firstly the PSC value divides the 72 MHz timer input clock to 1MHz. The external input is not scaled or filtered by any factor for simplicity. The input channel to be used is selected and set to detect rising edges of the incoming waveform.
Timer 2 interrupt occurs when either timer 2overflows or a capture event occurs. Each time a rising edge is detected, capture interrupt flag is set in the timer status register, TIMx_SR and the current timer count in TIMx_CNT register is stored in the corresponding TIMx_CCRn register. The time between two rising edges is captured and calculated in the interrupt sub-routine. Sometimes the time between these two edges may get long and so the timer may overflow. This is checked by the update interrupt flag. Using the time difference between two edge captures we can compute time period and thereby frequency. The following piece of code does this:
end_time = TIM2_CCR1;
pulse_ticks = ((overflow_count << 16) - start_time + end_time);
start_time = end_time;
The segment of the code shown below actually computes input waveform frequency.
f = (float)pulse_ticks;
f = (1000000 / f);
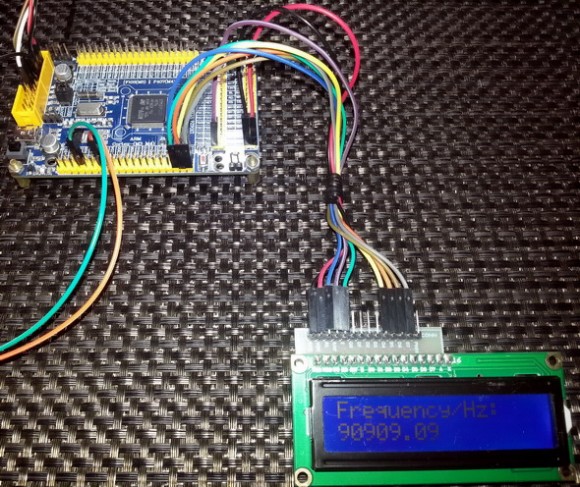
After completing calculations, a LCD display shows the value of frequency.
The following hardware setup is used for this demo:
#include "TIM_common.h"
#include "TIM2.h"
#include "TIM3.h"
#include "AFIO.h"
#include "GPIO.h"
sbit LCD_RS at GPIOD_ODR.B8;
sbit LCD_EN at GPIOD_ODR.B9;
sbit LCD_D4 at GPIOD_ODR.B10;
sbit LCD_D5 at GPIOD_ODR.B11;
sbit LCD_D6 at GPIOD_ODR.B12;
sbit LCD_D7 at GPIOD_ODR.B13;
unsigned int overflow_count = 0;
unsigned long pulse_ticks = 0;
unsigned long start_time = 0;
unsigned long end_time = 0;
float f = 0.0;
void setup();
void setup_IO();
void setup_TIM2();
void setup_TIM3();
void TIM2_ISR()
iv IVT_INT_TIM2
ics ICS_AUTO
{
if(TIM2_SRbits.UIF == 1)
{
TIM2_SRbits.UIF = 0;
overflow_count++;
}
if(TIM2_SRbits.CC1IF == 1)
{
TIM2_SRbits.CC1IF = 0;
end_time = TIM2_CCR1;
pulse_ticks = ((overflow_count << 16) - start_time + end_time);
start_time = end_time;
overflow_count = 0;
}
}
void main()
{
char txt[15];
setup();
while(1)
{
f = (float)pulse_ticks;
f = (1000000 / f);
lcd_out(2, 1, " ");
FloatToStr(f, txt);
lcd_out(2, 1, txt);
delay_ms(600);
};
}
void setup()
{
setup_IO();
setup_TIM2();
setup_TIM3();
Lcd_Init();
Lcd_Cmd(_LCD_CLEAR);
Lcd_Cmd(_LCD_CURSOR_OFF);
Lcd_Out(1, 1, "Frequency/Hz:");
}
void setup_IO()
{
AFIO_enable(true);
AFIO_remap(TIM2_not_remapped);
AFIO_remap(TIM3_not_remapped);
enable_GPIOA(true);
setup_GPIOA(0, digital_input);
enable_pull_down_GPIOA(0);
setup_GPIOA(6, (AFIO_PP_output | output_mode_high_speed));
enable_GPIOD(true);
setup_GPIOD(8, (GPIO_PP_output | output_mode_low_speed));
setup_GPIOD(9, (GPIO_PP_output | output_mode_low_speed));
setup_GPIOD(10, (GPIO_PP_output | output_mode_low_speed));
setup_GPIOD(11, (GPIO_PP_output | output_mode_low_speed));
setup_GPIOD(12, (GPIO_PP_output | output_mode_low_speed));
setup_GPIOD(13, (GPIO_PP_output | output_mode_low_speed));
}
void setup_TIM2()
{
enable_TIM2(true);
enable_TIM2_counter(false);
TIM2_ARR = 0xFFFF;
TIM2_PSC = 71;
set_TIM2_counting_direction(up_counting);
set_TIM2_clock_division(clock_division_tCK_INT);
set_TIM2_CC1_selection(CC1_input_IC1_on_TI1);
set_TIM2_CC1_state_and_polarity(enable, rising_edge);
set_TIM2_IC1_input_prescalar(0);
set_TIM2_IC1_filter(0);
enable_TIM2_CC1_interrupt(true);
enable_TIM2_update_interrupt(true);
NVIC_IntEnable(IVT_INT_TIM2);
EnableInterrupts();
enable_TIM2_counter(true);
}
void setup_TIM3()
{
enable_TIM3(true);
enable_TIM3_counter(false);
set_TIM3_counting_direction(up_counting);
TIM3_ARR = 799;
TIM3_PSC = 0;
set_TIM3_OC1_compare_mode(PWM_mode_1);
set_TIM3_CC1_state_and_polarity(enable, active_low);
enable_TIM3_counter(true);
TIM3_CCR1 = 400;
}
Demo video link: https://www.youtube.com/watch?v=cIz887UzTk8.
|
|


well done sir
How to set the PWM with Center aligned mode ?
Read this app note: http://www.st.com/web/en/resource/technical/document/application_note/DM00042534.pdf
Thanks,
Now need the sample code to change the CMS bits different from ’00’
Great tutorials! Best I’ve found so far.
Thanks…. 🙂
first of all i like to say a million thanks for this tutorial and i have been waiting for this
tutorial i am your biggest fan in stm32 programming for there is little information about it on the web you’ve motivated me to keep having interest in on knowing about the 32bit micros
Thanks…. People like you keeps me going…. 🙂
Pingback: STM32 Timers - Arduino collector blog