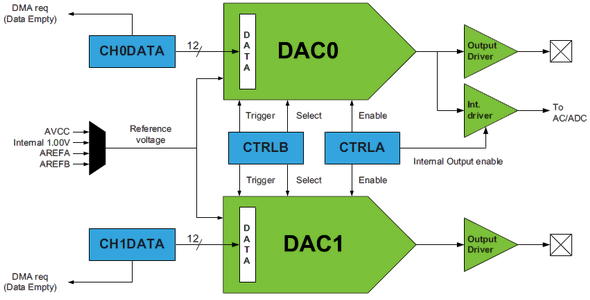
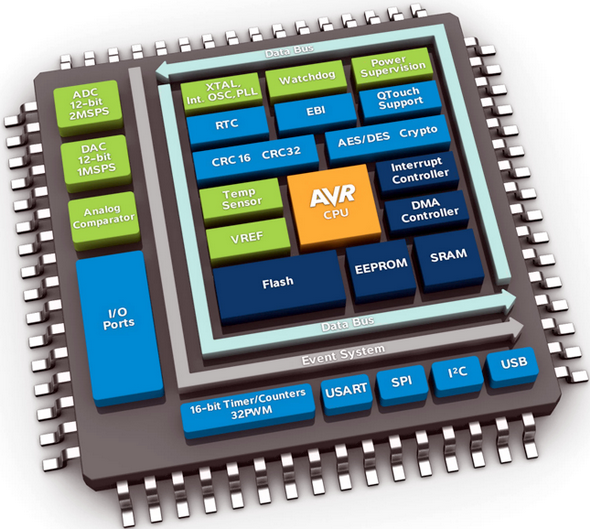
Author Archives: Shawon Shahryiar

XMega DAC

In embedded systems, oftentimes it is needed to generate analog outputs from a microcontroller. Examples of such include, generating audio tones, voice, music, smooth continuous waveforms, function generators, voltage reference generators, etc. Traditionally in such cases the most common techniques applied are based on Pulse Width Modulation (PWM), resistor networks and external Digital-to-Analog Converter (DAC) chips like MCP4921. The aforementioned techniques have different individual limitations and moreover require external hardware interfacing, adding complexities and extra cost to projects.  XMega micros are equipped with 12 bit fast DACs apart from PWM blocks and again it proves itself to be a very versatile family of microcontrollers. In this post we will have a look into this block.

DAC Internal Block Diagram

Read more

STM32 Digital-to-Analogue Converter (DAC)

After having played with Analogue-to-Digital Converter (ADC) of STM32 micros, the obvious next internal hardware block to deal with is the Digital-to-Analogue Converter (DAC). As the name suggests this block has just the complementary function of ADC. It converts digital binary values to analogue voltage outputs. The DAC block has several uses including audio generation, waveform generation, etc. Typically in most 8-bit micros, this block is unavailable and its need is somewhat loosely met with Pulse Width Modulation (PWM) block. This is partly because of their relatively less hardware resources and operating speeds. All STM32 micros also have PWM blocks but large capacity STM32s have DAC blocks too. The STM32 DAC block is not very complex and has similarity with the ADC block in terms of operating principle. The simplified block diagram below shows the major components of the STM32 DAC block.

Block Diagram Read more

STM32 Analogue-to-Digital Converter (ADC)

Most of us who have experienced 8-bit MCUs previously know how much important it is to have an Analogue-to-Digital Converter (ADC) built-in with a microcontroller. Apart from other hardware extensions unavailable in the early era microcontrollers, many former 8051 microcontroller users shifted primarily to more robust Atmel AVRs and Microchip PICs just for this important peripheral. I don’t feel it necessary to restate the advantages of having such a peripheral embedded in a micro. In traditional 8-bit MCUs aforementioned, the ADC block is somewhat incomplete and users have to work out tricky methods to solve certain problems. The ADC block of STM32 micros is one of the most advanced and sophisticated element to deal with in the entire STM32 arena. There are way too many options for this block in a STM32 micro. In this issue, we will explore this block. ADC Hardware Block Diagram Read more

Integrating STM32F4xx Standard Peripheral Library with MikroC Pro for ARM

STM32F4xx series micros are far more advanced than anything else similar in the market. Apart from being fast 32-bit MCUs, STM32F4s have rich hardware peripheral support with DSP engine bonus. In terms of capabilities versus price tag, STM32F4s are all-square-winners. In recent times there’s a surge in the STM32 user community. STM32 Discovery boards are proliferating like never before. In several occasions recently, I received tangible amounts of queries from readers regarding integration of STM32F4xx Standard Peripheral Library (SPL) with MikroC Pro for ARM and so even though it is not one of my mainstream posts on STM32 ARMs, I felt that I should address this topic. Previously I showed how to port STM32F1xx SPL for STM32F1xx series devices with MikroC. This post will not be different from the former one – only minute changes. I suggest readers to read the earlier post first before reading this one. STM32F4 Discovery Board

Read more

XMega External Interrupt

External interrupts are a must have feature in any microcontroller. Interrupts solve a lot of problem that would have otherwise been dependent on polling methods. For instance when we press the volume up key of a TV tuner’s remote controller, the remote controller quickly responds by transmitting the volume up command to the TV set and in turn the TV’s volume increases. This fast response is due to external interrupt issued by the remote’s button to the microcontroller it is connected to. If, however, all the keys of the remote were regularly and frequently scanned and then responded up on a press, the process would have been both slow and energy consuming because its microcontroller would then have never went to sleep or low power states and continuously kept scanning. In other words, the micro would have always ran despite no mandatory necessity and during standby conditions. This would have quickly drained the batteries. Since interrupt is typically used in such cases the remote controller will respond to a button press fast, wake up from sleep/idle/low power mode, transmit command data and then go back to sleep/idle/low power state. Thus the overall energy consumption is reduced while achieving fastest possible reaction. This is how real world applications work applying external interrupts.

XMega 3D


Read more

« Older Entries Recent Entries »